These Are Some Gorgeous And Cheap Homemade DIY Headboard Ideas

Your bed is the centerpiece of your bedroom. Every inch of it matters—from the sheets, to the pillows, to the mattress. The one element, though, that can have the biggest impact on the overall look, and feel, of your bedroom is your headboard.
But, what do you do if you have a headboard you don’t like? Or even no headboard, at all? You DIY one, of course. There are so many headboard designs to choose from on the market, and there are plenty of interior designers who can, for a fee, help you choose one that works best for your bedroom.
But, nothing quite gives you the same sense of satisfaction that comes from being able to put your own unique stamp on your favorite room in the house. So, if you’ve got even just a teensy bit of time on your hands, and some very basic skills, these must-see designs will have both your wall and your wallet smiling…
Farmhouse Headboard
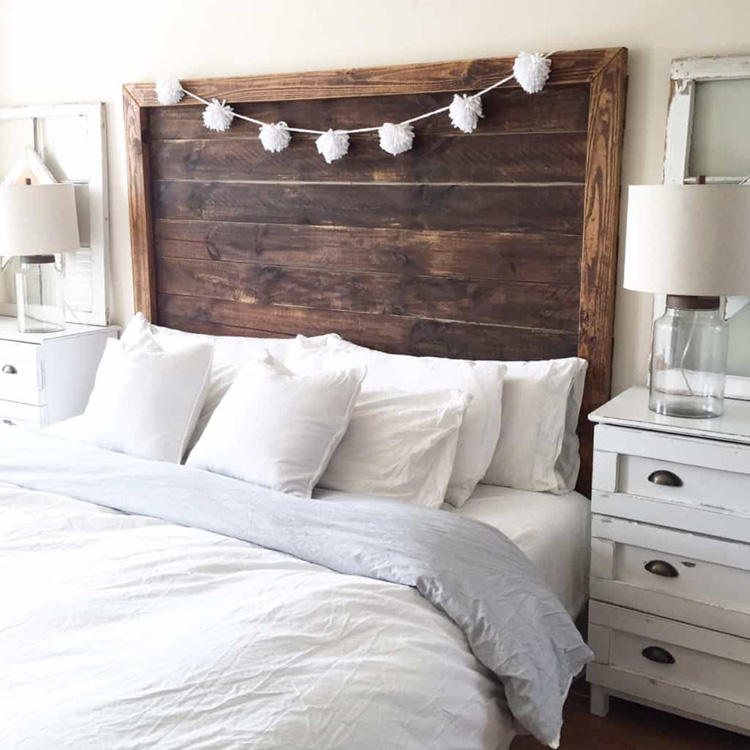
Are you interested in giving your bedroom a much cozier and rustic feel? Try out this easy headboard, inspired by the ever-popular farmhouse style. This DIY project could even cost you less than $50. What could be better than that? Just head on down to your local hardware store, pick up the necessary supplies, and you’re off to a great start.
Put some wooden planks together, attaching them at the back with a 2×4, and apply the varnish or stain of your choice. You can even decorate the board with a faux deer-head and a string of pom-poms, to add a touch of character and whimsy. For a more elevated look, you might even consider adding a row of LED lights.
Woven Headboard
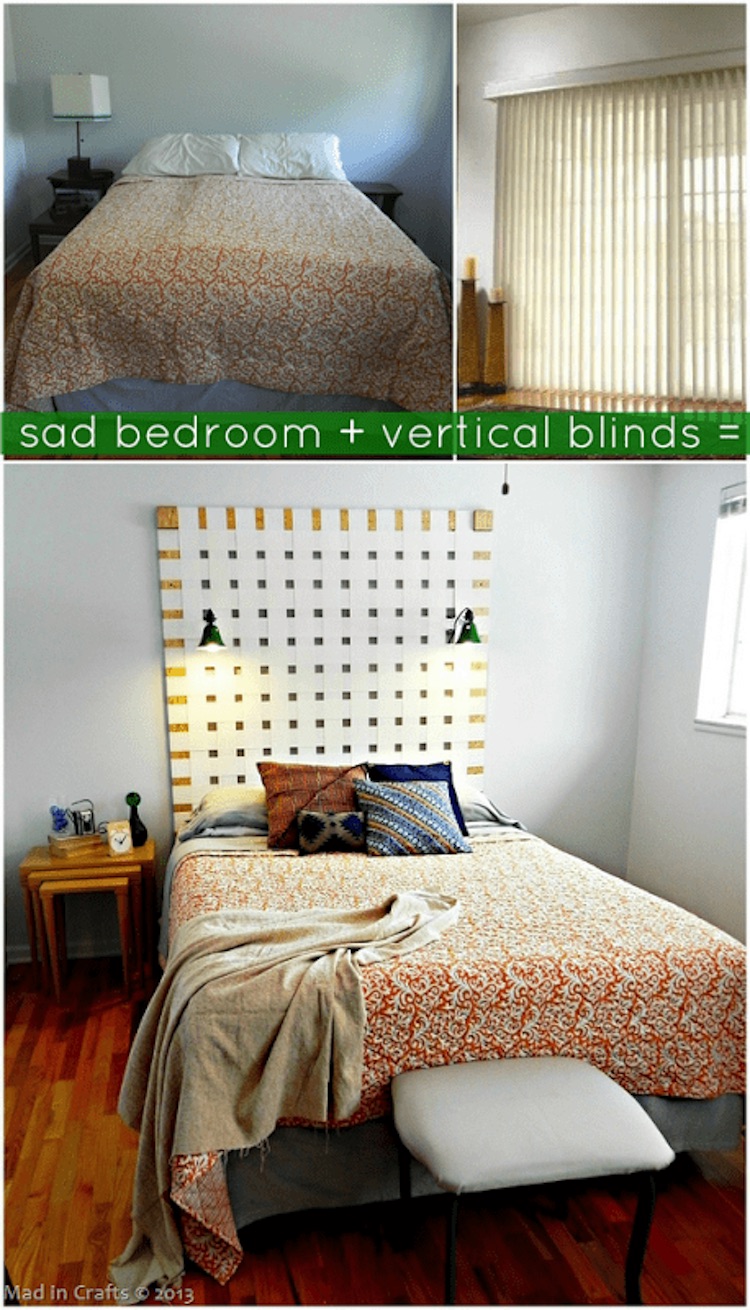
Got some old vertical blinds at home you’ve been dying to replace? Don’t trash them. Instead, you can weave them together, and attach them to a wooden frame to make a unique headboard, similar to styles that can sell for up to a whopping $700 at a furniture store. Ouch. But, you can make your own, and save yourself tons of money.
Why spend so much on a woven headboard from a store, when you can make one that suits your personal style to a ‘t’ for as little as $70? If you’re buying new blinds just for the project, that is. You can even add some clamp lamps on either side for as little as $10, for a more polished look.
Rustic Headboard
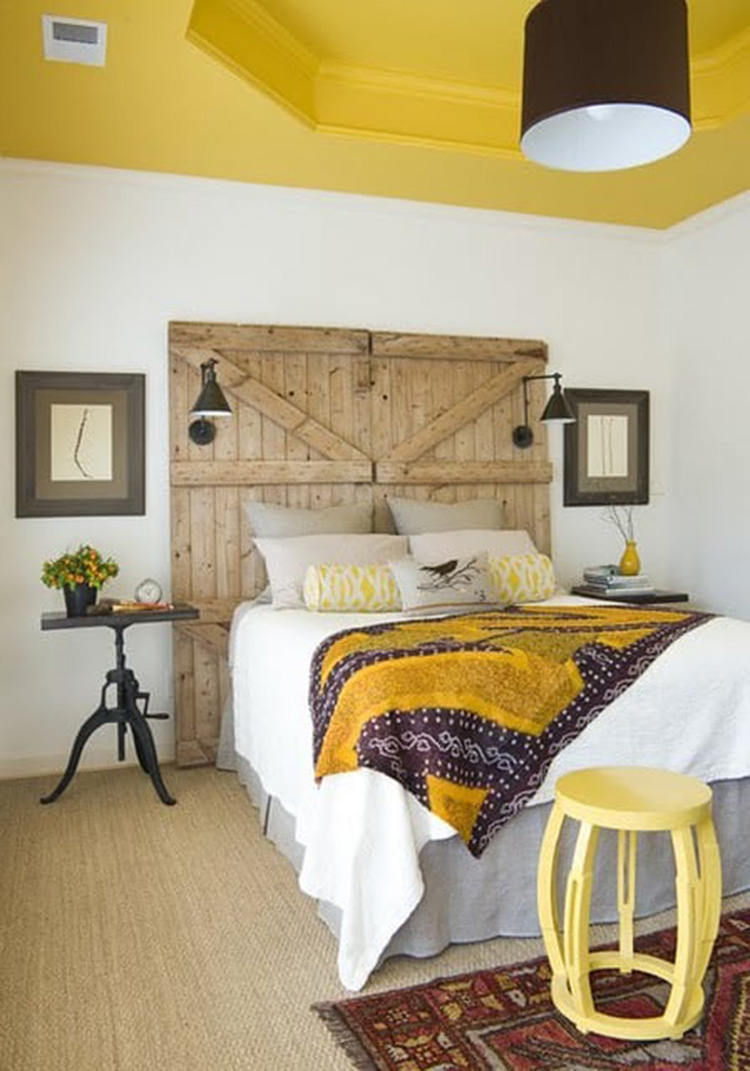
If you’re a big fan of the farmhouse style, or that barn door look, then you have to give this DIY project a try. That chic, country feel is well within reach with this simple project. You don’t even need to go buy planks of wood if you’ve got some scrap wood in your shed. Or, better yet, if you’ve got an old wooden door, you’re already most of the way there.
With a miter saw, a drill, and some inexpensive planks of wood, this headboard can easily be made in just a few hours. If you’re new to woodworking, this could even be the perfect beginner project. Especially if you’ve got someone who has a little experience, to help you cut the wood and fit the planks together.
DIY Pillow Headboard

Are you a fan of the softer things in life? If so, this pillow-based headboard project might be just the thing for you. This easy, minimalistic headboard can add a touch of sophistication to your space, while still keeping it casual and inviting. A small word of warning, though; pillows tend to get pretty dusty, so make sure to clean them regularly.
All you need are a couple of large, stiff pillows and some scrap fabric to sew on to make loops. Suspend it with a copper wire or shower rod to give it a sleek, polished look. Plus, these pillows are great to rest back against while reading a book, or watching television, in bed. With or without a snack. But, most definitely with a snack, right?
Woven Wooden Headboard
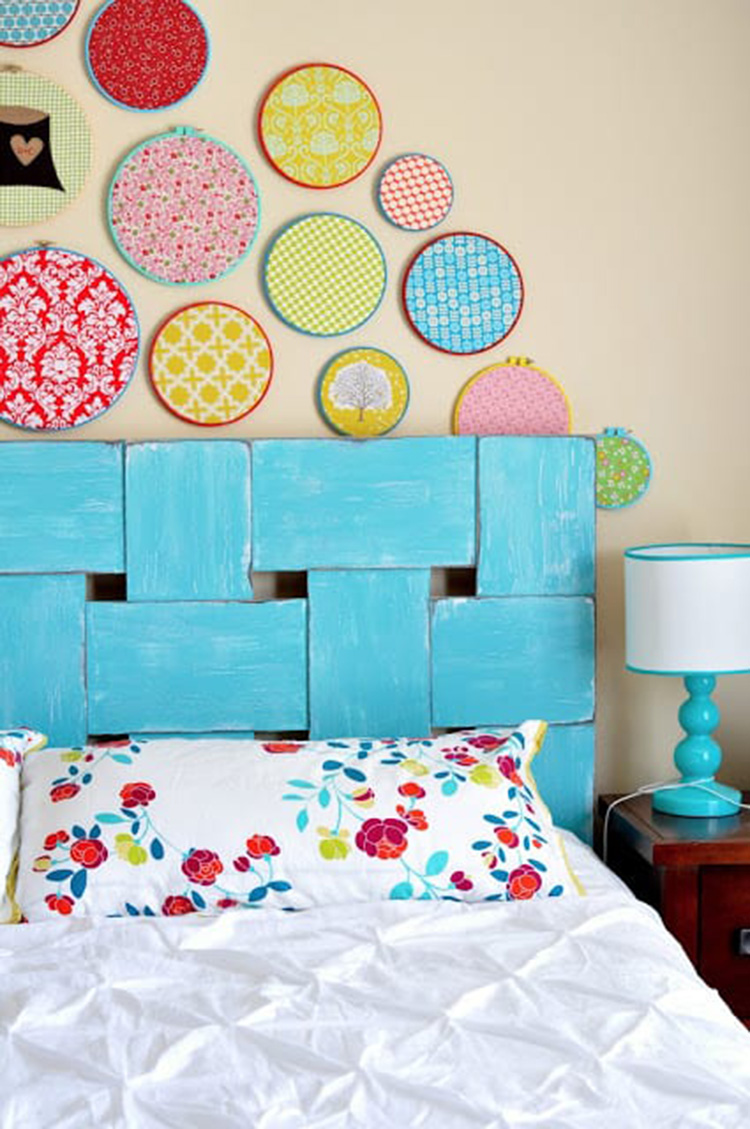
If you’re looking for easy DIY wooden headboard projects that are unexpected and out of the ordinary, then this woven wooden headboard could be the one for you. Its simple, shabby-chic basket weave look is sure to add some rustic charm to your bedroom. Plus, no one will be able to quite figure out how you were able to weave wood together.
Get some pieces of lumber cut at the shop in the desired size, paint them in the color of your choice, and “weave” the pieces together using some wood glue and a few well placed nails. Then, attach it to the wall at the desired height above your bed, and you’re done. You have a one-of-a-kind headboard that you made yourself.
Duct Tape Headboard
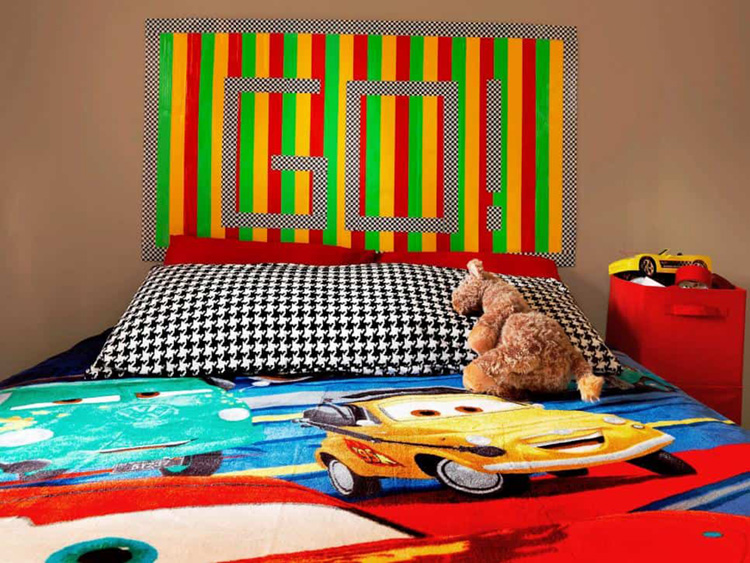
Remember when duct tape was all the rage? Everyone used duct tape everything—from wallets, to book covers, to full outfits. If you loved the duct tape look and want to add a little bit of it back into your life, then you might want to give this one a try. If not for yourself, then it could be perfect for a kid’s room.
Wait, is that really duct tape? This headboard looks like it was painted, right? It might be hard to believe that it’s all duct tape, but it is, and it’s easy to make, too. Just grab a piece of plywood or a large sheet of foam-board, some duct tape in your favorite colors, and start taping. With something this simple, not only is it easy to let your creativity shine, but it can also easily be re-done when you want a new design.
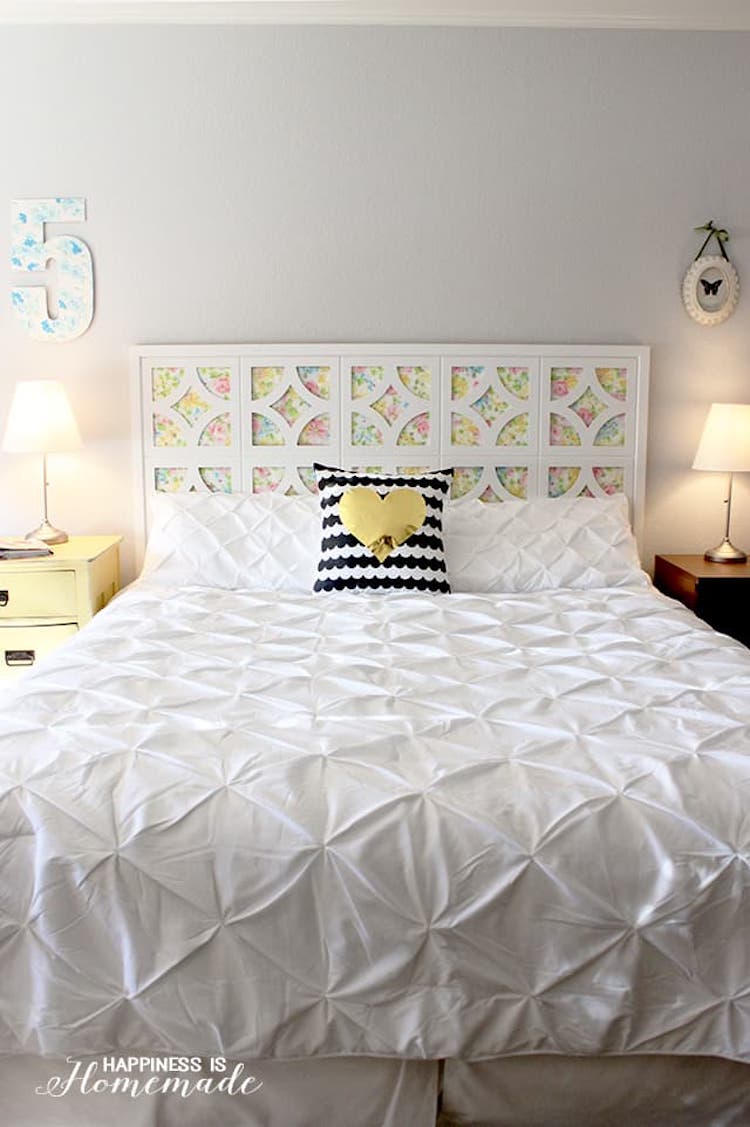
Bohemian Headboard
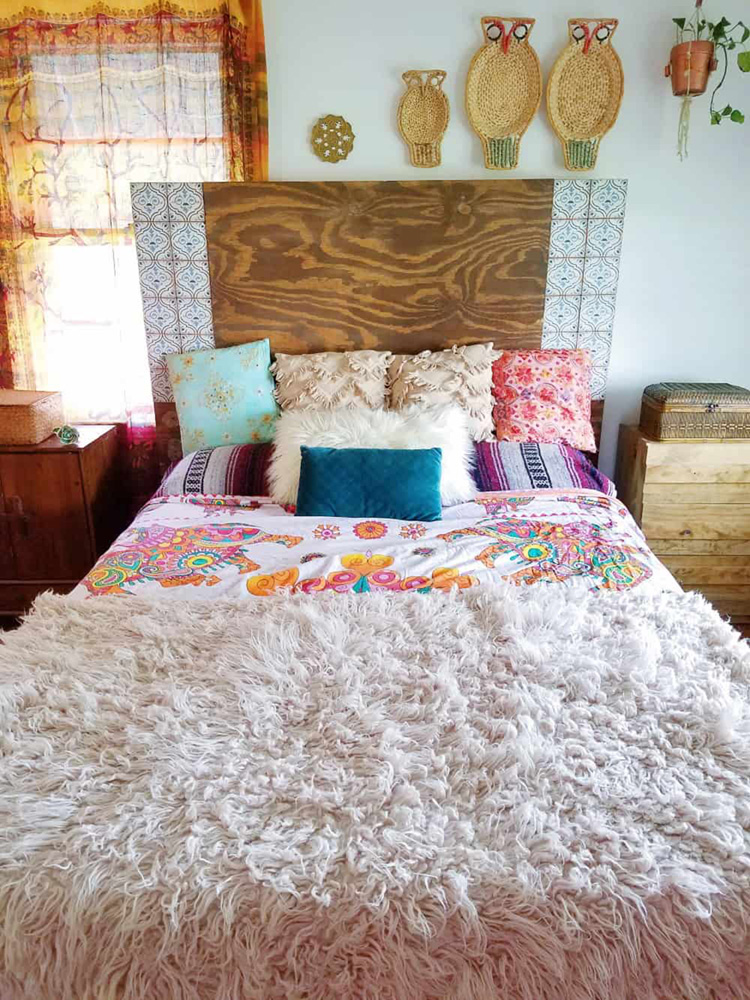
Are you a flower child at heart? If that sounds like you, this “boho”-inspired headboard is something you need in your life. This is the perfect project if you have a few leftover bathroom tiles, and some spare plywood lying around. Even if you don’t, they’re pretty inexpensive to buy, and construction is a total breeze. If you’re feeling artsy, you can even get plain white tiles, and paint your own design on them.
All you need to do is secure the wood in place behind the bed, and decorate the sides with the tiles. You can use tile adhesive, or some industrial strength super glue, to attach the tiles. Add a walnut finish to the plywood to give it a little more polish, or even paint it a color that complements your chosen tile.
Homemade Slipcover Headboard

This is probably one of the most simple headboards on our list. If you’re someone who dreams of being able to change the design of the headboard to suit your bedding, room decor, or just your mood, this slipcover could be the perfect choice for you. Depending on the materials you decided to use, it could also be one of the cheapest.
Just take a canvas slipcover, or even a drop cloth from the paint section, and attach it to a plain headboard or piece of plywood with some ribbons. You can sew the ribbons on, or simply tie them around the board. If you don’t have a plain headboard or don’t want to use a sheet of plywood, you can even attach the slipcover to your wall with some thumbtacks. Easy peasy.
Wall Panels
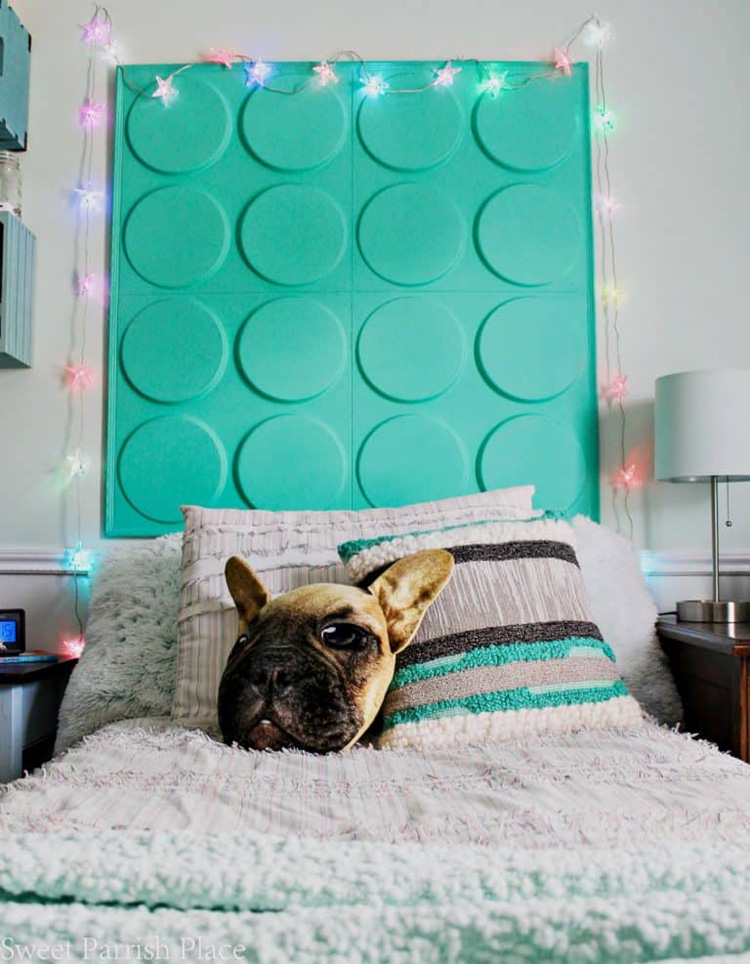
If you’re into LEGO or, in this case, more specifically, LEGO architecture, then you can make a themed headboard using these cool wall panels. Head over to the store and get some wall panels. Paint them the color of your choice, and frame them up against the wall behind your bed. If LEGO isn’t your thing, any panel design will do.
This is a great project for a kids’ room. You can even use multiple colors for the finish; you aren’t limited to just one solid color. The sky’s the limit. Speaking of the sky, you could even paint some clouds on them with sponges for a dreamy look. Bonus: if you’re doing this for a kids’ room, this is a great way to get them involved in a DIY project.
T-Shirt Headboard

Looking for a way to show off your collection of band or novelty t-shirts, without having to wear them? No doubt you know all about t-shirt quilts. You might even have one in your house right now. But, here’s a new one for you: have you ever heard of a t-shirt headboard? Take out all those old jerseys, band t’s and novelty shirts, and get a large work space ready.
Form them into a collage and fix it to the wall behind your bed. You’ll need some cardboard squares and staples, but the construction is pretty self-explanatory. If you’re looking for a softer piece, pull out your sewing machine, sew your t-shirt squares together, and use a staple-gun to attach them to a sheet of plywood over a piece of foam, or some batting.
Picket Fence Headboard

Have you been dreaming about having your own white picket fence? If you have, there’s no scarcity of ideas when it comes to using picket fences for DIY projects. Here’s just one headboard that you can create with picket fencing, giving your bedroom a rustic feel. Plus, it can be any color you want. You can even stencil some designs along the top.
For this one, you’ll need some dog-eared fence pickets—you can find these at any hardware store—which are fixed together, and placed behind the bed. To finish the look and add a dash of rustic elegance, you can add a couple of clamp lights on either side. These kinds of clamp lights are very inexpensive, and shouldn’t cost much more than $10.
Twinkle, Twinkle On The Wall
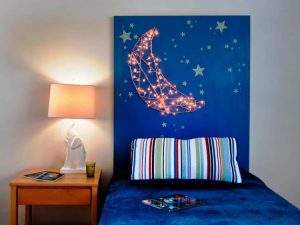
Have a little one at home? If so, this DIY project is perfect to make their room all the more beautiful and dreamy. Plus, it’s so simple that you just have to do it. Perhaps the best thing about this unique headboard is that, with the addition of fairy lights, it can even be used in place of a traditional nightlight.
Place a basic headboard—this could be a piece of plywood, or even foam-board—painted dark blue behind the bed or crib, to mimic the look of a night sky. Then, adorn it with fairy lights and glow-in-the-dark stars, to give it some extra sparkle. Add some extra pizzazz to it by sponging on some clouds in shades of purple, or even add a little glitter to catch those lights, and really make it sparkle.
No-Sew Headboard

Do you long for the rich, plush look of an upholstered headboard but either can’t, or don’t want to, go through the hassle of sewing? If you said, “that’s me,” then this DIY headboard might be right up your alley. Requiring no sewing at all, this project can take a drab old headboard, and turn it into something really special.
To achieve the look, take an old headboard and attach your choice of upholstery fabric to it, using a staple gun. To give it that classic boudoir feel, you can attach some foam to the board first, and then wrap it in a deep, jewel-colored velvet or brocade. But, why stop there? You can even hot glue some faux jewels around the edges, to really give it extra pop.
Recycled Book Headboard
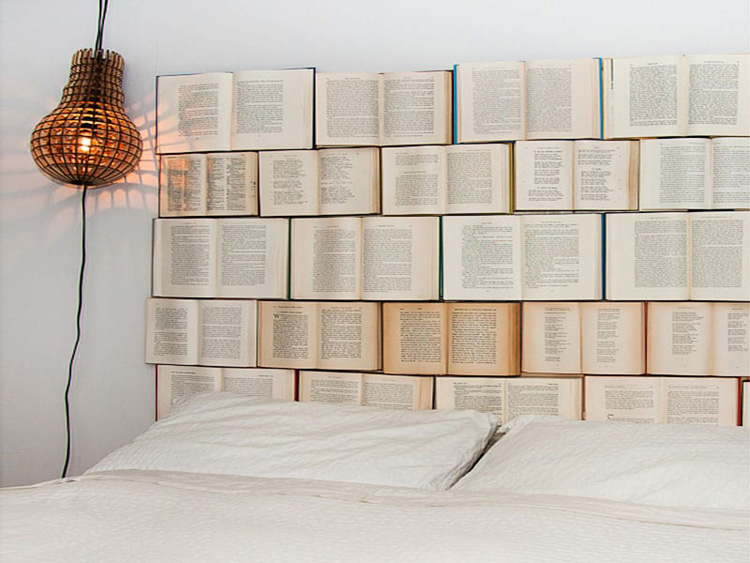
Would you consider yourself a bibliophile? Do you have a collection of old books that you’ve already over and over, but can’t bring yourself to part with? If you’re a true book-lover, this recycled book headboard is a perfect idea to spruce up the whole bedroom, and add a little personal flair. Plus, it’s a great way to give new life to your old books.
You can create a plain headboard by fixing some spare pieces of wood flooring together, or—you guessed it—use a plywood sheet, and frame it up with bamboo poles or fence posts. Then take some of those old books, and pin them up onto the headboard using a staple gun to get that thrift-store chic look of your dreams. Now you can rest easy, knowing that your beloved books are always with you.
Forest-Style Headboard

This one is for the nature lovers out there, or anyone who’s always wanted to sleep in a tree house. Perfect for kids, and kids-at-heart, making this forest-inspired headboard is quite simple, won’t take up a lot of time, and can easily be completed in just a few hours. It’s also a great excuse to take a trip to your favorite thrift shop.
For this, you’ll need to find an old headboard at your local thrift store. Next, you’ll sand it down and paint it white. Now comes the fun part: go out into the yard and grab some of the best looking small branches you can find, and paint those white to match. From there the decoration is up to you. You could add some little birds and bows, leaves, or even decorate it with flowers.
Pegboard Headboard
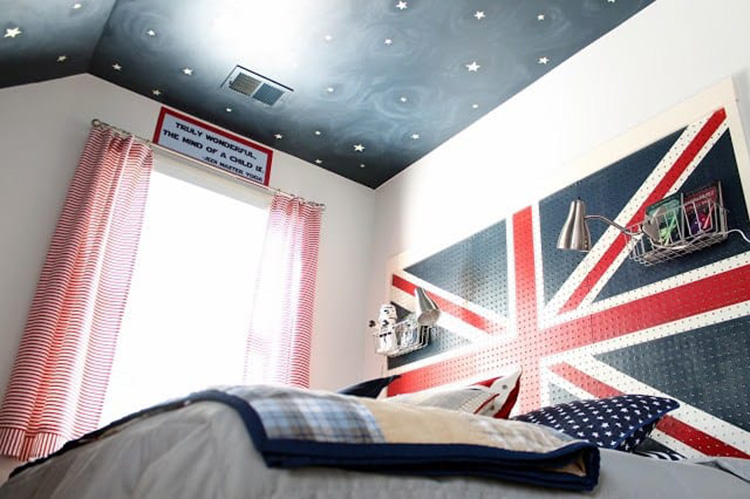
Do you love bold colors? Do you like the idea of extra storage? If so, then you should spruce up your bedroom with this ingenious pegboard headboard. Easily done in an afternoon, this simple and practical DIY headboard can really bring out your inner creativity. Not to mention that it’s a great way to get some of that extra clutter off the ground.
Here’s what you need to do: get a few pegboards—you’ll be able to find them at a craft store or hardware store—and cover them in bold, graphic vinyl stickers; or outline the boards using a painter’s tape, and let your imagination run wild. Once your chosen design is complete, simply attach it to the wall using some screws. All you need now are some hooks to add some baskets and lamps, and you’re all set.
Floating Furniture As A Headboard
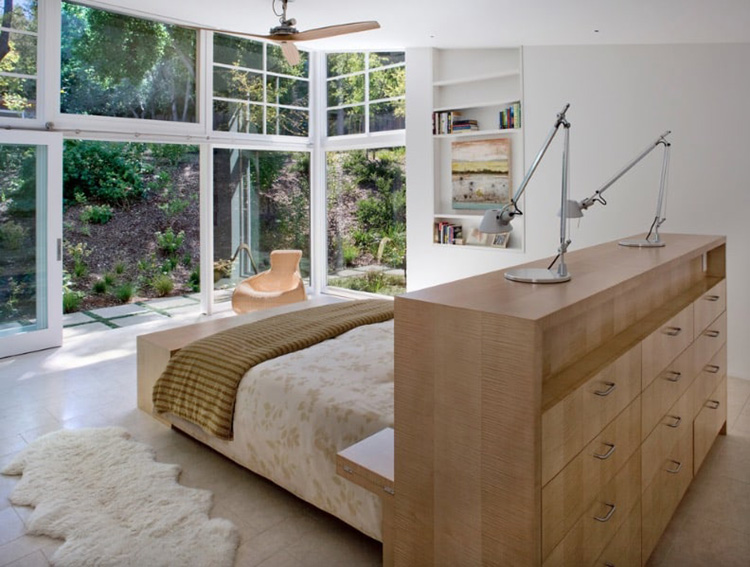
If you happen to have one of those spacious, sprawling bedrooms then this bold—and slightly eccentric— idea for the headboard might be just the thing to bring the whole room together. It especially works if you’ve been feeling like you have too much open space in the center of your room. Why? Because this DIY headboard requires you to move your bed to the middle of the room.
Once you’ve rearranged your furniture and your bed is in the center, just place a dresser or a cabinet with closed drawers behind the head of the bed, and pop some lamps on the top to finish the look. You don’t have to leave the dresser or cabinet empty, either. Use it to store extra clothes, linens, or your favorite books, so they’re always within reach at bedtime.
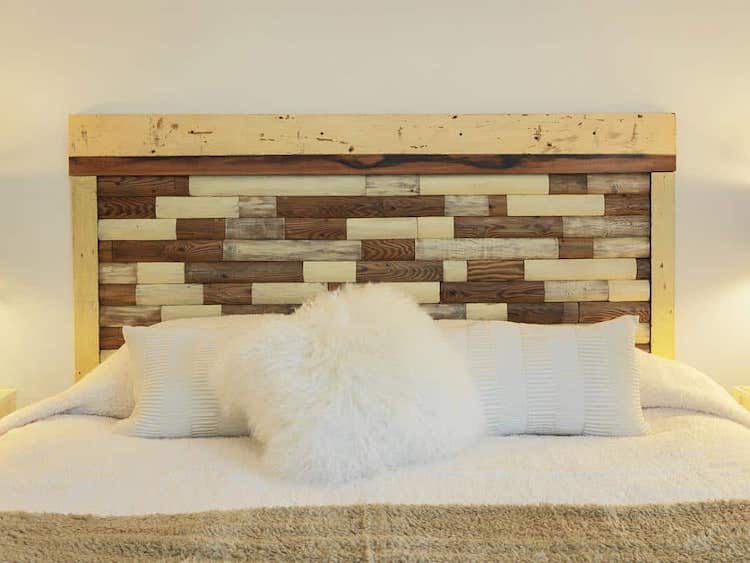
Rustic Style Headboard
This is a simple tongue-and-groove style headboard that only requires basic woodworking skills to bring to it life. All you need to make this one is some wood planks, a hammer, and plenty of nails. Oh, and don’t forget your stain or paint color of choice. It’s such a basic design, but the effect is very polished and refined.
After you frame the board together, you can paint it and then distress it for a reclaimed wood feel. Or, to class it up a bit, cover it in your favorite stain, and add a glossy varnish to give the wood a warm, cozy glow. Or, if solids are more your style, paint it out in all black or gray for a chic, monochrome look.
Live Edge Headboard

Do you long for a sophisticated wooden headboard, but are a novice at wood-cutting? Worry not! This may be the easiest wood-based project on the whole list. And it only takes about two hours to complete. It’s a great project to start with if you’re itching to get more experience with a saw, but don’t want to get too complicated too fast.
Just draw the desired edge on the plywood, saw along the lines, and mount it to the wall behind your bed with some sturdy screws. If you’re feeling like it needs a little something extra, you can stain it, paint it, or stencil a complementary design on the headboard before you set it up. Just make sure that you give it plenty of time to dry before you install it.
Area Rug As A Headboard
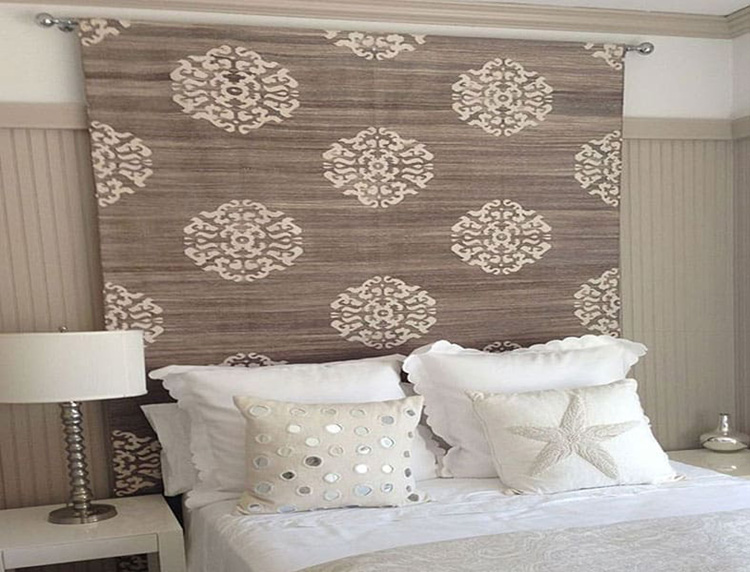
Do you have an old rug at home that you’re no longer using on your floors? Don’t toss it, or give it away. Hang it on the wall behind your bed using a curtain rod, to create a unique headboard that’s simple and adds a touch of softness to your room. The best part about this headboard is that it can help to dampen sound, especially if your room has all hardwood flooring.
A standard 5×8 rug will work for a queen-size bed, but you’ll want a bigger size if you have a king. If you don’t have a spare rug, or if what you have just isn’t your style, look for a rug that’s thin and light-weighted, like an Indian dhurrie-style rug. Sale racks and outlet malls are also great places to find beautiful rugs at a hefty discount.
Photo Frame Headboard

What better way to keep someone or something that you love close to your heart? This photo frame headboard does just that. It’s also a great way to add some rustic charm to your bedroom, with a mix of different colored woods. You can even make this out of any scrap wood you have lying around. You can leave the wood unfinished, or paint and distress it for a little character.
Unlike a similar headboard that you’ll see later on in this article, this one has only one large frame, with planks lined up on four sides to the desired size. And, you might be asking yourself, what should you put inside the picture frame? You could use a picture of your family, a favorite place, or a serene nature scene. The choice is yours, but anything that is meaningful to you will do.
Macramé Headboard
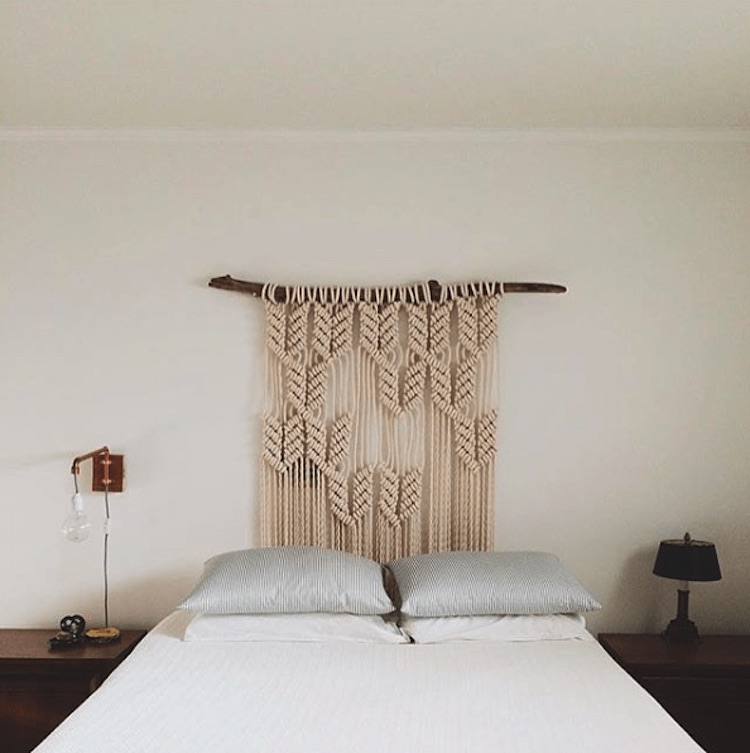
Love dream catchers, yarns, texture, and woven textiles? Why not incorporate those things into a chic, bohemian headboard? Those gorgeous, woven banners you keep seeing everywhere on social media aren’t just for wall art anymore. They’re a great addition to any room, plus the design potential is endless. From the very simple to the totally elaborate, you are sure to find a pattern that speaks to you.
Get some beautiful macramé (like the one in this picture) from an upholstery store, or weave one all by yourself, and suspend it like a curtain by using a tree branch as a frame for an elegant and personalized look. Not only is this a great way to learn a new skill, but it adds a simple, handmade aesthetic to your room without screaming “handicrafts.”
Room Divider As Headboard
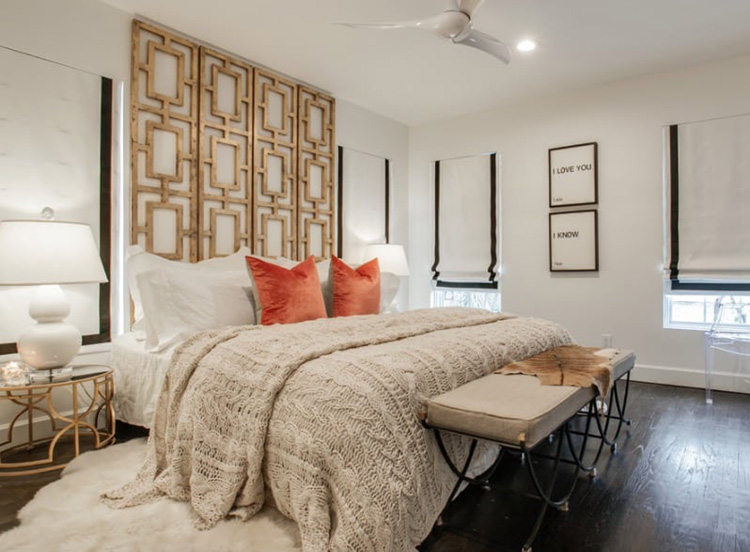
Want to try a unique and easy way to transform your whole bedroom? Try using this collapsible room divider as a headboard instead of a conventional, solid headboard. There are so many shapes and designs to choose from, you are guaranteed to find the perfect shape and size to suit your room and your style. The best part is that you can easily take it down when you’re ready for a change.
You can use an old divider, or get a cheap one from the store. There will be plenty to choose from at your local home improvement store—the flea market, or thrift shop, are also great places to look for room dividers. Now, just set your divider up behind the bed. No screws required. You can even paint the divider or the frame to complement the decor in your room.
Statuesque And Dramatic Headboard
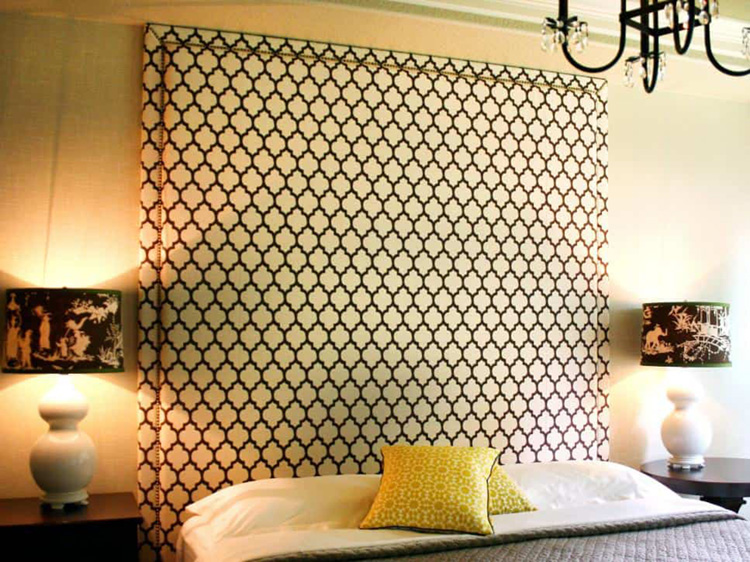
If the one thing your bedroom is missing is a dramatic focal point, consider this floor to ceiling statement headboard. If that sounds like what you need in your life, then give this DIY project a try. It might look simple, but sometimes the simplest things can create the most buzz, and take your bedroom from plain Jane to elegant and refined.
For all the drama and style that this headboard packs, though, it’s super easy to make. All it takes is some fabric of your choice, a sheet of plywood, some foam for padding, and a staple gun to secure the fabric to the board. After that, the only things you’ll need are a hammer and some nails to attach it to the wall for an instant injection of style.
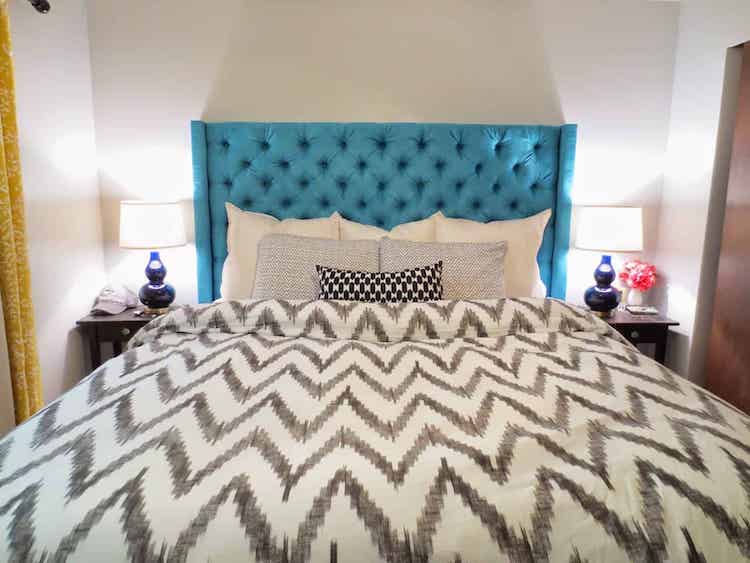
Winged Headboard

Most upholstery-based projects need sewing, which is why a lot of people usually steer clear of them. Either they just don’t like to sew, or they simply don’t own a sewing machine. This winged headboard, though, doesn’t need a single stitch, and can be done with some very basic, and relatively inexpensive items from your local hardware and craft stores.
All it takes is a piece of plywood, some foam or batting, four to six yards of fabric—it’s always a good idea to have extra—28 buttons, and a lot of nails. Wondering how much everything would cost? Well, if you were to buy something like this from a furniture store, you could easily spend about $1,000. But, if you’ve got some time and the desire, you could make your own for around $140.
Fabric Panel Headboard

If you’re in the market for a headboard that’s not only easy to make, but also gives your bedroom a cozy feel, this fabric panel project is worth giving a try. It’s perfect for a larger bedroom with lots of empty wall space, and can really help fill up your room. Plus, it doesn’t get too much easier than this.
First, you’ll need to measure out how long you want your headboard to be, and then all you have to do is cut a piece of thin wood according to your desired size—measure twice, cut once. Then, wrap it in the fabric, using some hot glue to fix the material to the board; or warp the board, and staple the edges to the back of the headboard.
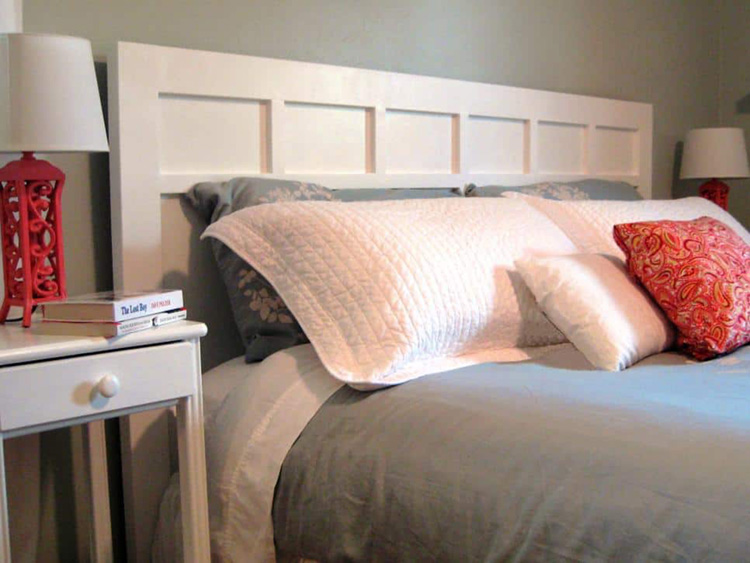
Cottage-Style Headboard
This DIY project can make your bedroom look like you just stepped into your favorite catalogue or magazine. That’s really the ultimate goal, isn’t it? We all dream of that clean, modern-looking bedroom that looks like you just went into a showroom and brought the floor display home. Well, with this headboard, you’ll be one step closer to that goal.
To achieve this look, you can pick up any standard piece of plywood and attach a frame to it, adding smaller strips of wood to make the pattern. Paint the whole board white to give it a crisp, elegant feel. If you’re looking for something even easier, you can get a white door and use that to create a similar style.
Faux Headboard
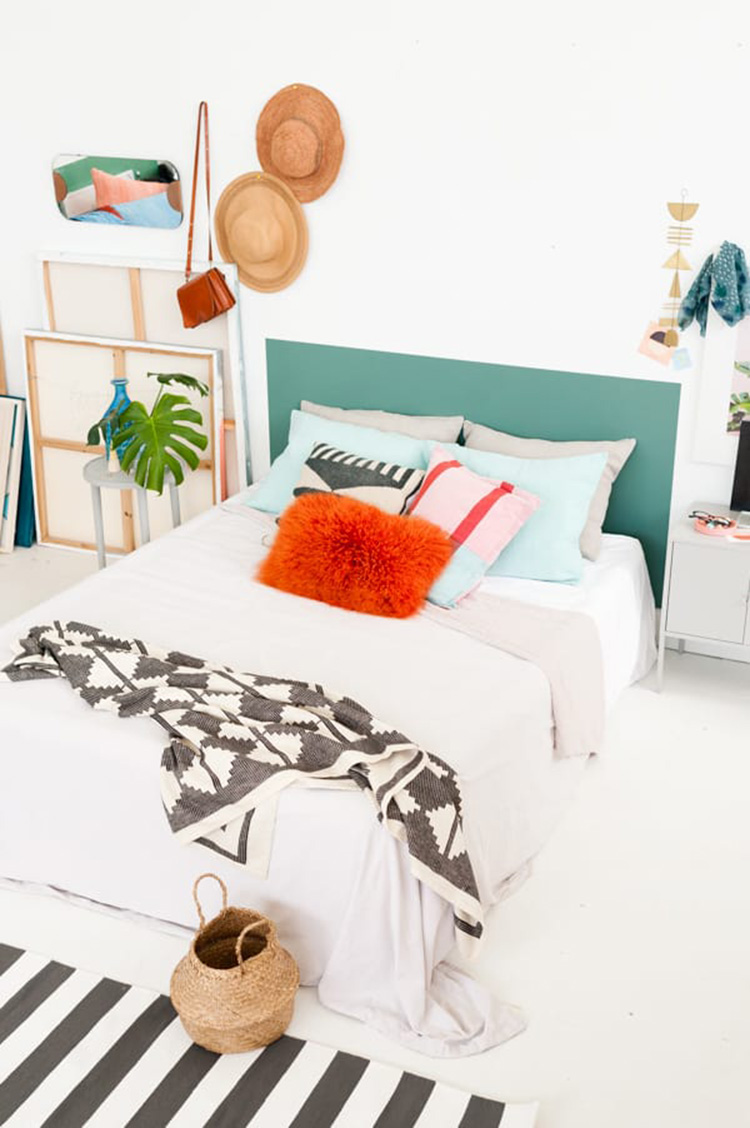
Want to create the look and feel of a headboard, but don’t want to have an actual headboard taking up unnecessary space in your room? Or, maybe you just like a more minimalistic approach? If that sounds like you, then this super easy faux headboard is exactly what you need. Plus, you can use up any spare paint you have in your garage.
Just frame out a rectangle on your wall with the help of some painter’s tape, and fill it in with any color your heart desires. When we tell you that it won’t take more than an hour, we mean it. You really can’t get more simple than this. What you can do, though, is get more creative. Try adding a few extra strips of tape in a simple design inside your rectangle for an eye-catching pattern once you peel the tape off.
Narrow Vertical Panel Fabric Headboard
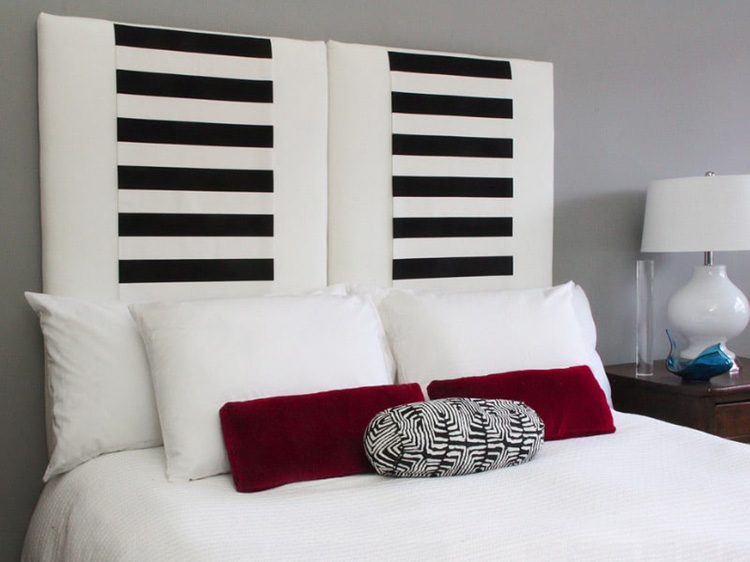
Experimenting with new looks and patterns is a great way to spice up your bedroom. Especially if your final look is totally unexpected and unconventional. So, when we came across this project, we knew it needed to be shared. Most of the DIY headboards you see on this list are done in a horizontal style, but this one is vertical, adding some extra interest and height to the room.
Just get a couple of wood panels, cover them with a neutral fabric, and add some foam in between if you want a softer look. Use a bold, contrasting fabric to create the runners—or just use some table runners—to give it a fresh twist. You can even change the runners out whenever you change up your bedding, so that the entire room still looks like it was meant to go together.
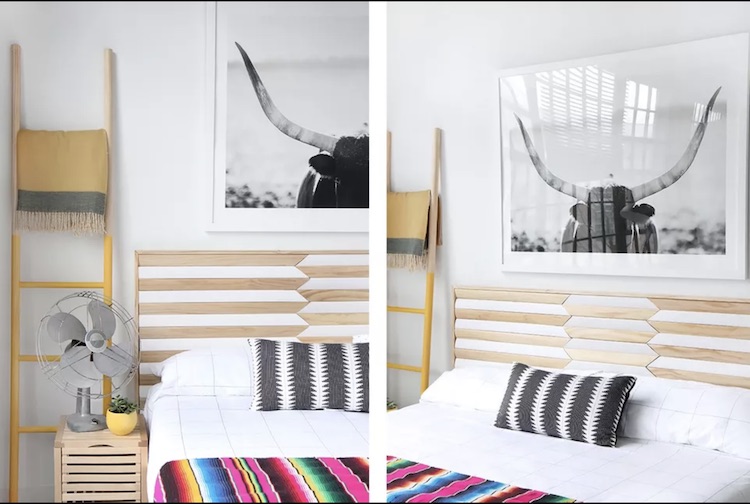
Lean-Able Slatted Headboard

What’s the great thing about this headboard? Apart from its sleek, slatted look, it can be propped upright or leaned back against the wall, so that you can sit back and relax comfortably while reading a book or watching TV in bed. This is great for those who love spending time and doing things from the comfort of their bed. Maybe someone like you?
To create this headboard, grab some wooden planks in two different widths and attach them to some posts at the back with nails—if you have a nail gun, now is the time to use it. Finish the wood with a warm paint color, or a simple stain. You can even try a two-toned look like the one pictured here.
Plywood Headboard
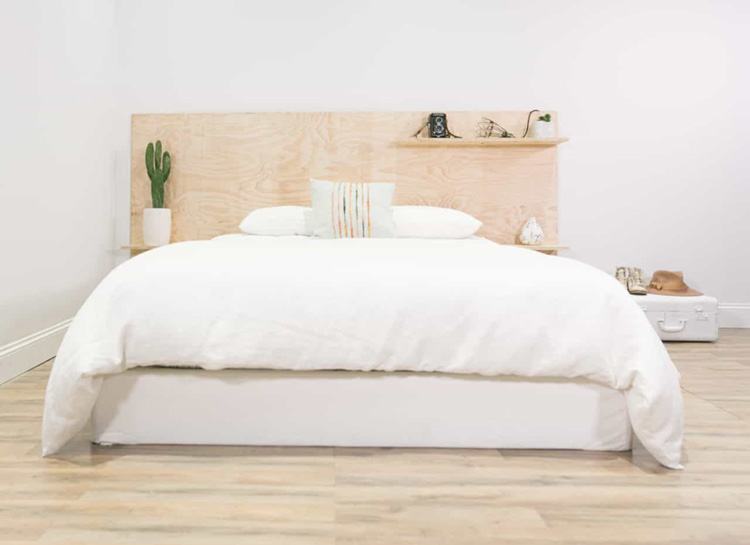
If you’re into a more minimalistic look, then this headboard is going to be the perfect choice for you. It’s sleek, simple—even modular—design is reminiscent of everyone’s favorite Swedish furniture brand. You know the one. They sell great meatballs. Sometimes all it takes is a simple design to bring your whole room together, to create the look and feel you’ve always wanted.
The only things you’ll need are a piece of plywood (to be mounted on the wall), a hammer, and some nails to fix some shelves onto the sheet of plywood. You don’t even need stellar carpentry skills to make this. Most hardware stores will offer to cut your pieces of plywood to the exact sizes that you need. Once you have the right cuts, most of the work is done.
Fabric Mosaic Headboard

Now, if you want a headboard that gives your bedroom an elegant look while still keeping it cozy and inviting, look no further than this beautiful fabric mosaic headboard. This one could take a little bit more work than some of the other headboards in this post, but the results will be well worth it, and your friends will be amazed when you say, “Oh that old thing? I made it myself.”
Start out with foam that’s anywhere from 2” to 5” thick—how thick you want it is up to you— and get it cut into the desired size at the store, or take it home and make the cuts yourself. Wrap the pieces of foam in the fabric of your choice using hot glue to hold it in place, or break out the sewing kit and sew the edges together. Then, suspend it on the wall with the help of command strips, and you’re done.
The ‘Sail Off To Sleep’ Headboard

This PVC pipe headboard is so easy to make. And perfect for a teenager’s bedroom. Not to mention a great way to show off their love of boats or the beach. Or, if they’re into sports, you can paint their favorite player’s number—or their own number, if they’re on the high school team—on the sail for a more personalized touch.
Just grab some PVC pipes and joints from the hardware store, and paint the pipes silver to give the frame a metal look. To finish it off, take a small piece of boat sail, or a sheet of canvas fabric, and fasten it to the frame with the help of some rope and grommets. The great thing about this headboard is that it’s light, and easy to move if your teenager suddenly decides to re-arrange the bedroom.
Cedar Shingle Headboard

New to DIY projects? Don’t worry, this one’s for you. But, what if you’ve only got $10 to spare? Still no worries. In this case, $10 is all it takes to make this gorgeous, textured headboard that’s sure to be a head-turner. Extra bonus points if you adore the look of cedar shingles. Now you can have them inside, where you can enjoy their rich texture day and night.
With all that texture, this project might look difficult, but it’s a super easy DIY that promises some pretty incredible results. All you need for this one is a hammer, nails, some cedar shingles, a sheet of plywood, and a couple of hours on a free day. Once your headboard is complete, you can leave the shingles unfinished for a natural look, paint them, or stain them.
Three-Dimensional Fabric Headboard

At first look, this show-stopping headboard seems like a crazy project to undertake. But boy, are you about to be surprised at how easy it is to replicate this look. With just a few basic items, you can have your own headboard that looks good enough to have been made from expensive acoustic wooden panels. And all for a fraction of the cost.
For this elegant three-dimensional headboard, collect cardboard of different sizes and wrap them up in the fabric of your choice—you don’t even have to use fabric. You could simply lather the cardboard up with some hot glue, and stick pieces of laminate flooring on to create the look of wood. Then use command hanging strips to create an amazing headboard with some real depth.
‘It’s Not Metal!’ Headboard

Don’t want to put too much effort into your headboard, but want to have something that looks great? Well, this is the one for you. Just like the “Sail off to Sleep” headboard, this one is made using PVC pipes, painted silver. So, head back out to your favorite hardware store to grab the right supplies, and you’re already halfway done. Pro tip: just like many hardware stores will cut wood for you, they will also cut PVC pipes to whatever size you need.
Once you’re home, coat the pipes with silver paint, let it dry, and then put them together. Next, wrap some string or twine around the headboard in all different directions, finally adding clothespins to the string. What you pin to the headboard is your choice, but a few postcards or photos would be a great addition. This industrial-inspired look is great for guys or gals, and those who love to travel and want a fun way to show off their pictures.
Channel Tufted Headboard

If you aren’t one for traditional headboards, then this design by Emily Henderson is something that you must try for yourself. Not only does it add some elegant texture and interest to a bedroom, but it can also serve as a shelf for your books, or a small art collection. Try layering some paintings together, just like the pictures, to add some extra dimension to your finished look.
This one is simple to make, but you’ll want to make sure you have a free weekend set aside to get it all done. You’ll need plenty of your favorite fabric, a long sheet of plywood—maybe several, depending on the size of the wall—lots of stuffing, and some basic sewing skills. Sew up five long tubes of the fabric, making sure they’re the right length for your backboard, stuff them until they are nice and firm, sew up the ends, and then attach them to the plywood with a staple gun for extra security.
Corner Fabric Headboard

This next headboard is the perfect fit for a guest room, or a kid’s room where the bed is pushing into a corner—as opposed to being in the center of the room. If that sounds like your situation, then this might be the right solution for you to jazz up the room, while still saving that valuable floor space.
All you need to do is put up two low profile headboards against the two walls where the bed is located, creating a simple corner-style headboard. If you don’t have two extra headboards lying around, just use two pieces of plywood or foam board. To give it an elegant finish, cover it in a fabric that coordinates with the room. You can even add a matching skirt to tie it all together.
Picket Fence
Picket fences are a staple in the DIY world. They’re cheap, readily available, and can be used in countless ways to make all of your do-it-yourself dreams a reality. So, why not bring your picket fence obsession into the bedroom with this simple, but sweet and stylish, headboard? Plus, with the way this headboard is designed, no one will ever know that all it took was some fencing.
Pick up a few picket fence boards, and cut them up into smaller pieces. For more dimension, cut several different sizes. Next, clean them up and give each of them a different finish, before putting them together in a frame. You can finish them with a stain, paint, or any easy varnish. Finally, mount the frame onto the wall behind the bed with some screws, and you have your very own, very vintage-looking, picket fence headboard.
DIY Jute Headboard
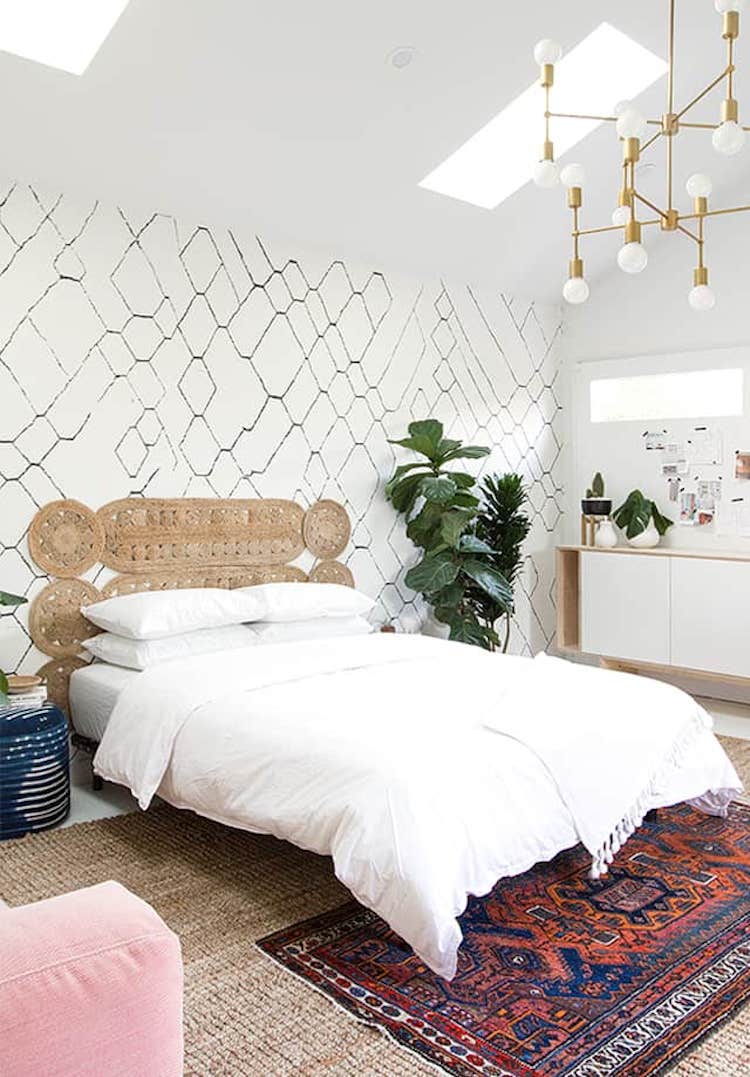
For those who are looking for a more “boho” feel in their bedrooms, this jute headboard could be the go-to design. To make this, just get some jute placemats from the store and attach them to the wall in a pleasing design, using a nail or staple gun. Yup, it’s that easy. Seriously. They’re easy to take down and change out, too.
But, if you don’t want to spend much on ready-made jute mats, you save yourself a ton of money by knitting your own. Making them yourself will take more time, but there’s nothing quite like the satisfaction creating your perfect headboard from scratch. And, of course, you have the added bonus of complete control over the size and look of your mats.
Work Of Art As A Headboard
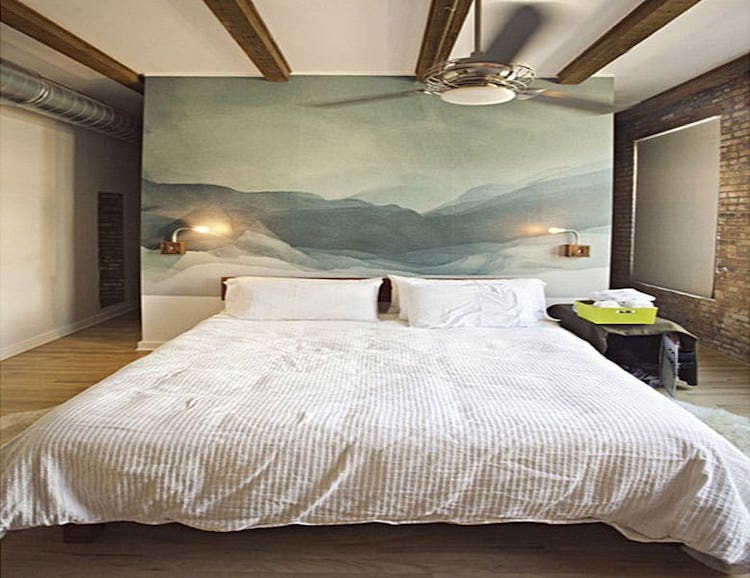
Using art as a headboard wouldn’t be the first thing to cross your mind, right? But, we all love to place works of art around the house. It shows off our taste, style, and personality. Plus, they’re nice to look at, adding interest to your space. So, why not add even more art to your home by using it as a headboard?
Depending on the look you’re trying to achieve, try using a huge mural or landscape painting as a headboard. You want to look for something really big that will cover most of your wall, to really make an impact. If you prefer a softer, padded headboard, have the artwork printed out to your choice of canvas, and tack it to the wall with a nail gun over a large piece of foam. If you’re really creative, you can even paint your own mural, either on the wall, or on some canvas.
Fireplace Mantle Headboard

Do you have an old, empty fireplace mantel that you don’t know what to do with? Lots of older houses—and even some apartments—have them nowadays. If you have one in your house, or if you have a standalone mantle you picked up from an antique mall, then this could be just the way for you to dress it up. Oh, and it’s super easy to create, too.
If your empty mantle is already on the wall, just move a bed in front of it. Or, if you have one by itself, set it up behind your bed and decorate it with a tufted upholstery (extra points of the fabric has a vintage design), and ta-da, you have a medieval-look inspired headboard, that immediately uplifts your bedroom. Simple, isn’t it?
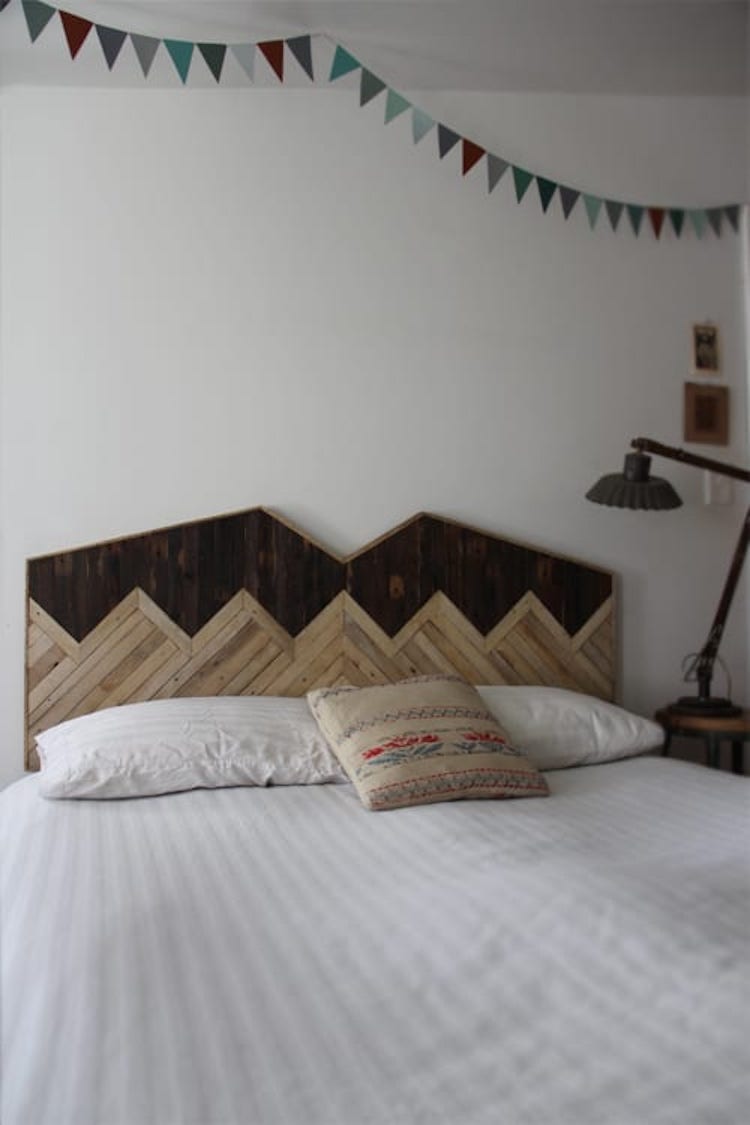
Geometric Wood Headboard
If you happen to have a miter saw at home, this amazing project is going to be so easy for you to create. You can do it even if you don’t have a miter saw, but it will take a lot more effort. Either way, who wouldn’t be enchanted by the gorgeous geometric and tribal look, which can really take your bedroom style to another level?
To make this headboard, you need to get some plywood, and cut it to the required shape and size for your design—the internet has loads of free designs, or patterns. Once cut, assemble your headboard using some wood glue, or a hammer and nails. Add some throws and pillows to your bed in a similar style, and you have yourself a full-on look.
An Artsy Collage Headboard

For a chic, contemporary look that’s to die for: pick up a few canvases in different sizes from an art store, to create an artistic headboard for your master bedroom that no one else will have. Paint them all one color, or use several complementary colors for a livelier, more “fun” look. Even better? With a few simple tweaks and color choices, this could even be perfect for a kid’s room.
Paint these boards with high or semi-gloss paints in bold colors, and mount them on the wall as shown in the picture. For extra pop, paint the edges of your canvases with a neutral or contrasting color, to get that perfect finished look. If you find that buying a bunch of canvases is outside of your budget, you can achieve the same look with cardboard boxes.
Sweet Dreams Headboard

Do you have some old picture frames lying around the house that you never use, and don’t know what to do with? Don’t drop them off at the thrift store. Find a new use for them, like turning them into a pretty little headboard. If you don’t have any frames on hand, you can easily—and cheaply— pick a few up at the Dollar Store to complete this project.
First, you’ll need to print out the letters to spell “SWEET DREAMS.” Then, just pop them into the frames and mount them on the wall. You can even personalize the letters to spell out the name of the person who sleeps in that bedroom, or any other inspirational words. This is a fantastic idea to personalize children’s bedrooms, especially if those rooms belong to little girls.
DIY Faux Brass Headboard
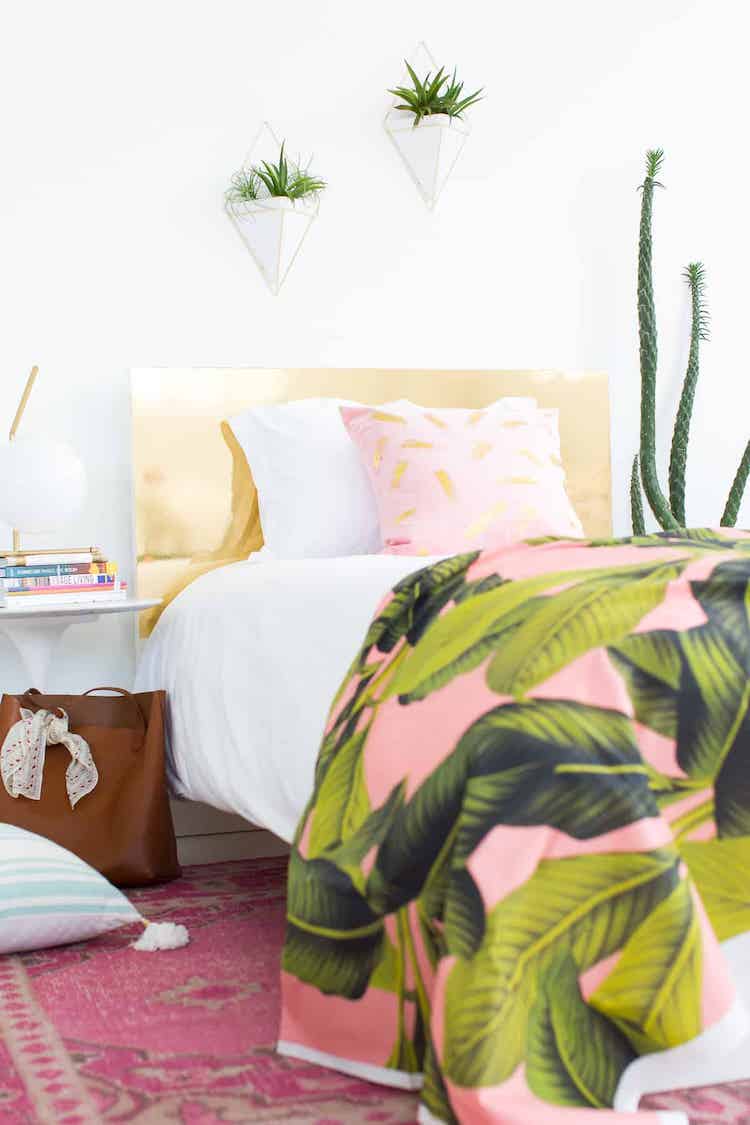
There’s nothing quite so polished—literally—as the look of a brass headboard. But, brass can be pretty expensive, and not always the most modern-looking material. If you want a modern metal headboard and happen to have a plain IKEA headboard at home that needs a facelift, this could be the perfect solution for you. You get the look of this popular metal, without the added expense.
It’s so simple to make, too, and can easily be done in an afternoon. All you need is some gold or brass-colored adhesive foil (you can even get pretty convincing squares or sheets of metallic vinyl), and a pair of scissors. Measure out the foil or vinyl to fit the dimensions of your headboard, cut to the right size, peel off the metallic vinyl, and stick the sheet carefully along the headboard. And done. Easy, right?
Pillow Headboard

This next headboard on the list doesn’t require a lot of effort on your part, as it’s made of something you probably already have lots of in your home—or, if not, something you can easily pick up at a craft store: pillows. You already have lots of comfy pillows to cradle your head as you sleep. Why not make them into a perfectly plush headboard, as well?
All you need to do is get some pillows and mount them on your wall using a nail or staple gun. For a look that complements your bed, you can get some covers or pillow cases that match your sheets and blankets. Just make sure that you’re not using pillows in your headboard that you regularly use to sleep on. That way you won’t have to keep putting them up and taking them down.
Diamond Tufted Headboard
Do you want to have a headboard that looks luxurious and expensive, but only costs you a little bit of money and a few hours work over the weekend? Then look no further. This diamond tufted headboard is just what you need to add a touch of glamour to your bedroom, without the glamorous price tag. It’s also an excellent choice for a teenage girl who likes a little bling.
To create this pretty piece, you’ll need some foam, a pegboard, fabric, upholstery thread, upholstery needles, and buttons—faux-crystal buttons if you’re looking for something sparkly. Layer the foam over the pegboard and wrap the fabric around it, attaching the edges to the back with a staple gun. Then, take a marker and make evenly spaced dots to show where you’ll sew your buttons. Finally, sew in the buttons to make the tufts, using the holes in the back of the pegboard, and then attach it to the wall. Bling on a budget.
Chevron Headboard
There’s just something about a chevron pattern that looks so modern and stylish, but also utterly sleek and timeless. What better way to bring some classic sophistication into your bedroom than by creating this DIY chevron headboard? If you’ve got some basic carpentry and woodworking skills, then you can make this chevron headboard for right around $100. A total steal, right?
The same kind, when bought in a store, could cost you somewhere around $1,600 or more. That’s as good of a reason as any to put that woodworking talent to use. Just think of all the money you’ll save by crafting your own. Plus, this can easily be made from any scrap, or reclaimed, wood you’ve got lying around in your workshop.
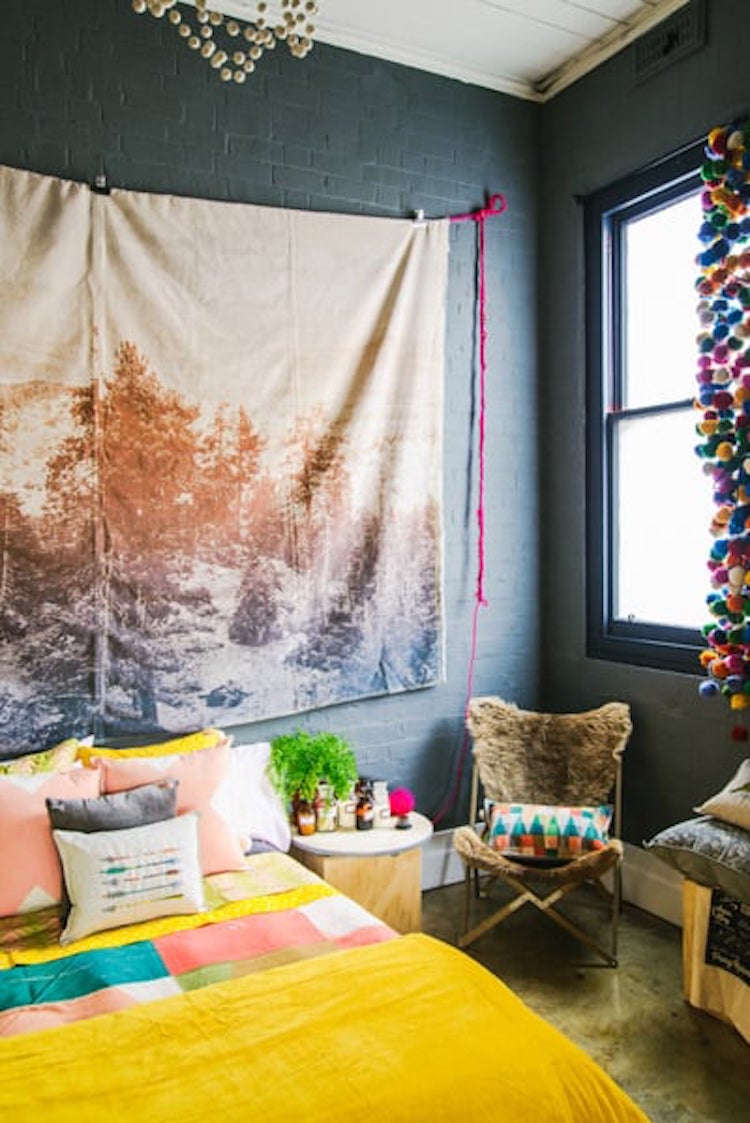
Curtain Headboard
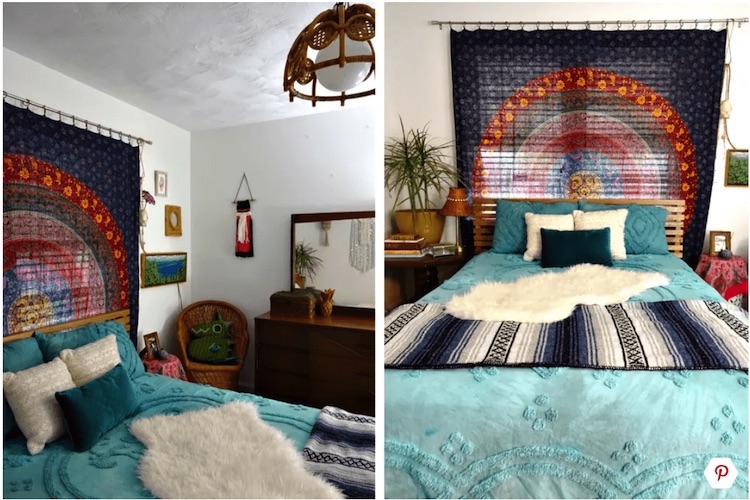
There’s nothing wrong with experimenting when it comes to headboards, right? Hey, not everyone is going to be into wooden or foam-based headboards. If that resonates with you, you might consider using a curtain or a tapestry as a headboard. Not only is this super simple to do, but it can also add your own personal style and flair to the room that a conventional headboard won’t.
Curtains and tapestries work especially well as a headboard when your bed is placed by, or in front of, a window. It can dress up your window, and create an opportunity for you to have the feel of a headboard in a place where it’s impractical to put a large, solid object. Plus, using a curtain or a tapestry allows you to move it throughout the day to let more light in as needed.
Cardboard And Fabric Headboard

Would you believe it if you were told that this headboard is made out of a sheet of cardboard and some fabric? Well, believe it or not, that’s exactly what it’s made out of. If you’re on a shoestring budget, this DIY headboard can give you that touch of elegance without breaking the bank. And it’s so, so easy to make, too.
Literally all you need is a big sheet of cardboard or foam board, a few yards of fabric, and some buttons. Just wrap the fabric around your board, attach it with some hot glue, and add the buttons. For more of the plush look, you can even add some foam padding between the board and your fabric. This is the perfect headboard if you’re tight on cash, or want a fun, easy project to do in a few hours.
Hang A Textile

Now, this one is just like the curtain and rug headboards we talked about earlier, but here you can use a thick textile that’s woven, and nail it directly onto the wall. This one seems really simplistic—and it is—but with enough imagination, you can create a bold, artistic headboard in a very short amount of time, for very little money.
Heck, you might not even have to spend any money at all on this one. Especially if you use some unused fabrics from around the house. Or, if you don’t have any unwanted fabric lying around, head to the thrift store, where you’re sure to find some fun prints. You aren’t limited to a solid piece of fabric, either. You can use many different fabrics to braid and weave a whole new textile of your very own.
Embroidered Headboard

Embroidery is having another moment. It’s not just a hobby for your grandma and her circle of friends anymore; embroidery is back. Bigger, bolder, and more beautiful than ever. Embroidery on a headboard can instantly elevate the look of your bedroom. Whether it’s a simple piece like this one, or something more intricate, you can create something sleek and elegant, or totally bohemian.
This one, with sharp lines embroidered over a navy blue, is perfect for modern bedrooms. Just take the embroidered fabric and pin it to a plywood board before fixing it onto the wall. If you’re pining for a more “boho” feel, look for a floral pattern with a little bit more going on, to add some extra visual interest to the room.
Door Turned Headboard
If you’re renovating your house, then you will probably have a lot of things lying around that you might want to toss. You might even have a spare door or two. Don’t put them out in the street for the garbage collectors just yet. With a little bit of time, and a coat of paint, you could give that unwanted door a whole new life as a perfectly shabby-chic headboard.
Paint it out in colors that complement your bedroom. You can even add some stenciled designs, and a strip of crown molding to the top edge, and presto. A cheap—maybe even free—headboard, worthy of your favorite HGTV designers. For a more dramatic look, you can even stack two doors together, and put them up either vertically or horizontally to get a tall, stately looking headboard.
Antique Window Headboard
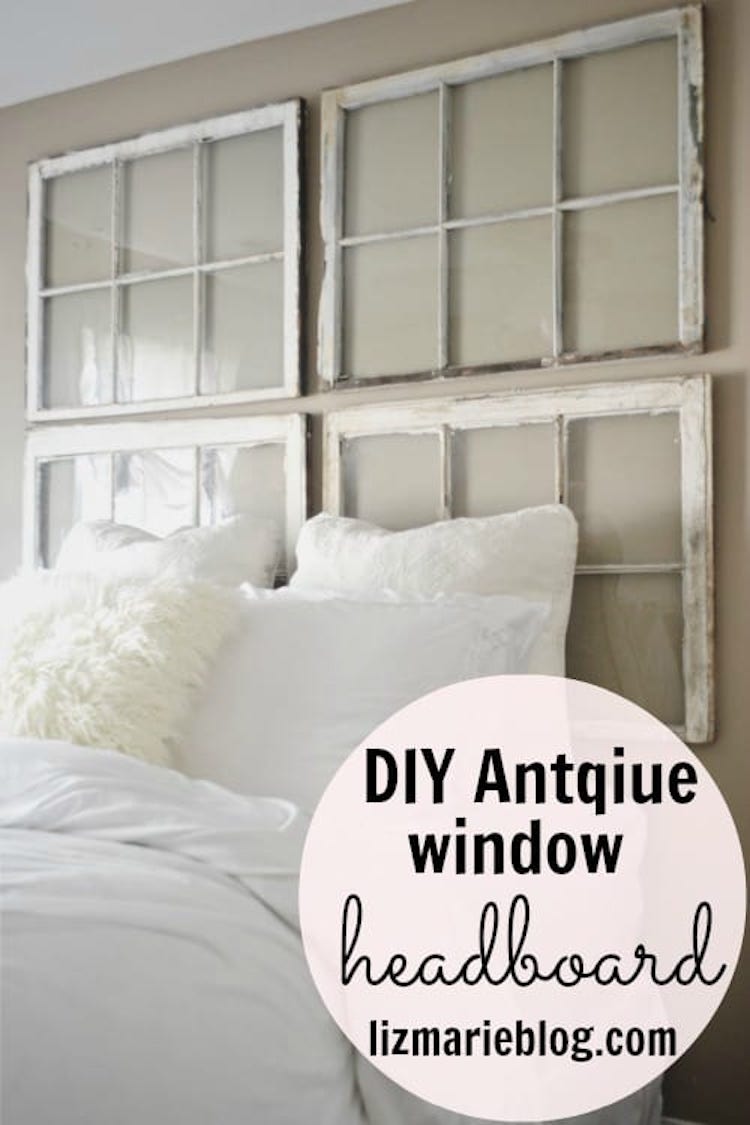
This one is sure to be a favorite of those who love a reclaimed and vintage feel. If you’re an antique mall fiend, you’ve probably noticed the old windows they usually have set up on display, right? Most people will just use them as wall art, but what about turning them into a beautiful, custom headboard? All you really need to do is buy the windows and hang them.
This way you can give your home a little Victorian, or old farmhouse, vibe without having to spend a bunch of money on new pieces that were made to look old. Even better, you don’t even need to refinish these, if you’re into the weathered look. And, let’s be honest, if you’re interested in these windows, that weathered look is right up your alley.
Door Headboard
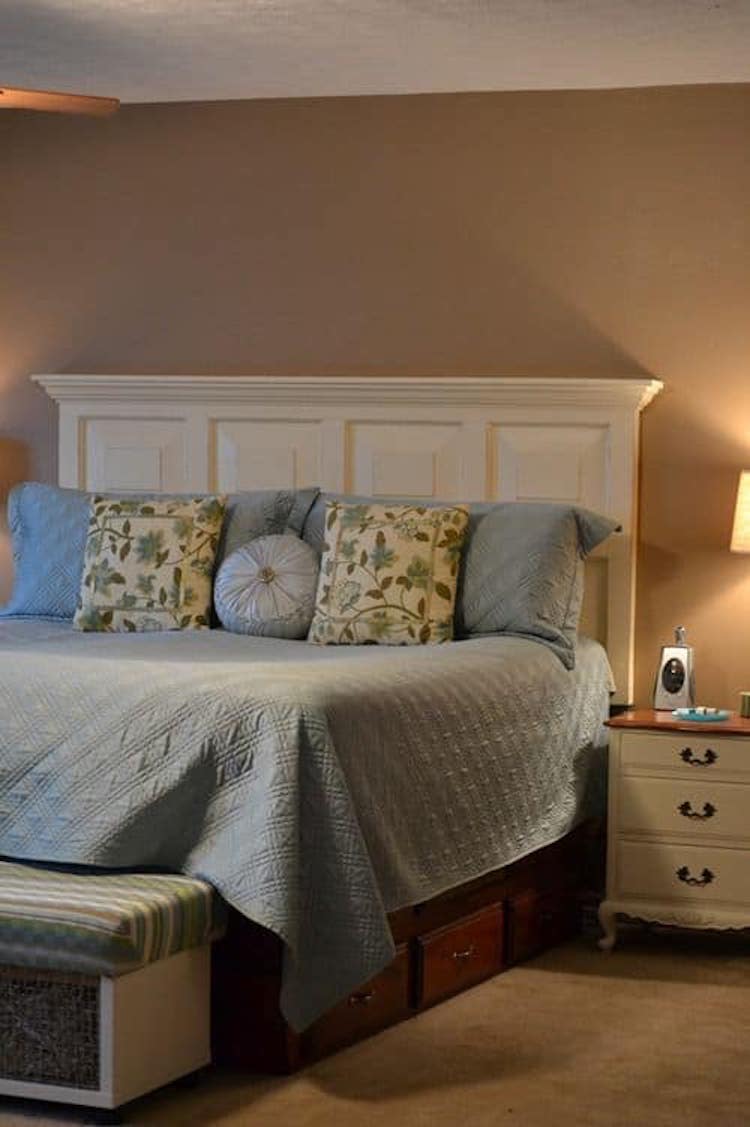
Yup, another door headboard on the list. They’re so simple and so chic, it just needed to be shared. This one is even easier than the first, and can be made simply by taking an old door and painting it white. Unlike the first one, painted in different shades, this clean white will work in any bedroom, no matter the color palette or decor.
You can even add some molding to the top edge, and attach some 2×4 posts to the back, to give it some extra height if your bed is pretty high off the ground. If you want to dress this one up a little more, string some fairy lights around it for a soft, magical twinkle, and a little something extra.
DIY Light-Up Headboard
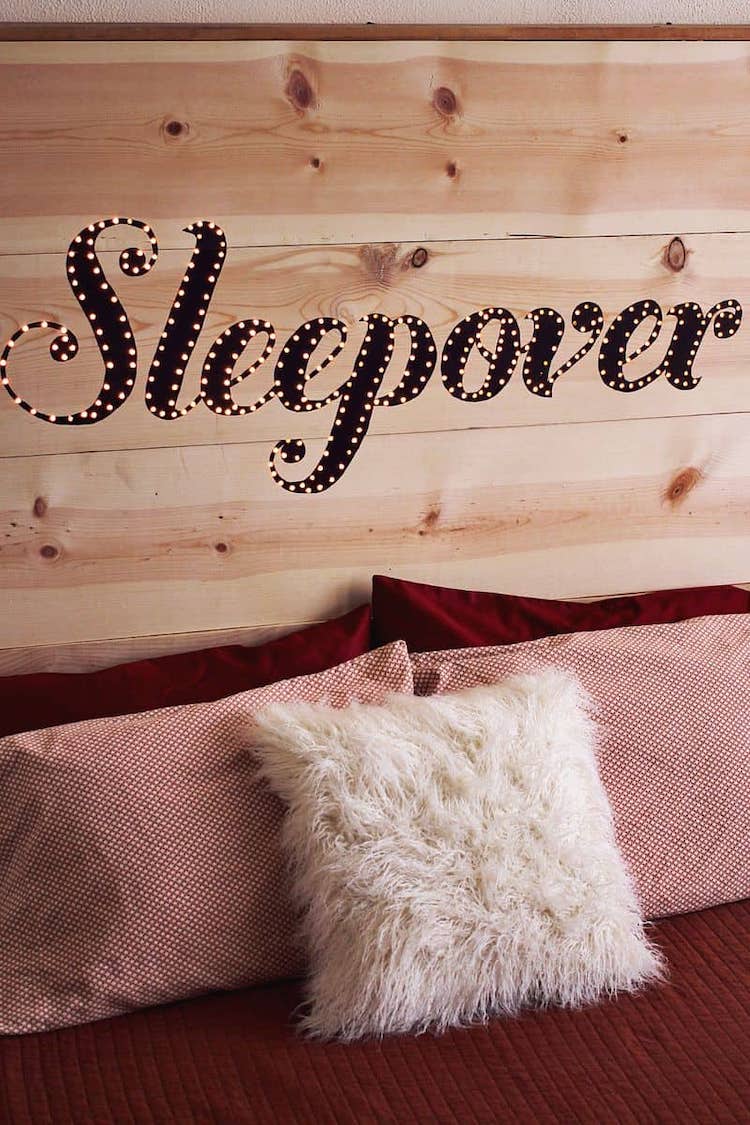
Plain wooden headboards can also be spruced up to give them a new life altogether. But, here, it might not mean what you think. In this case, it means adding some letters, or a fun pattern, instead of just staining or painting it out. It will take a little extra time, but a personalized piece like this can really make your bedroom that much more special.
Take this particular example for instance: just like the person who created this, you can make a stencil of a word, a quote, a whole passage, or even a name. Paint it black and drill some small holes in it that you can push fairy lights or small LED lights through, and light it all up. This could be your chance to see your name in lights.
DIY Floral Headboard
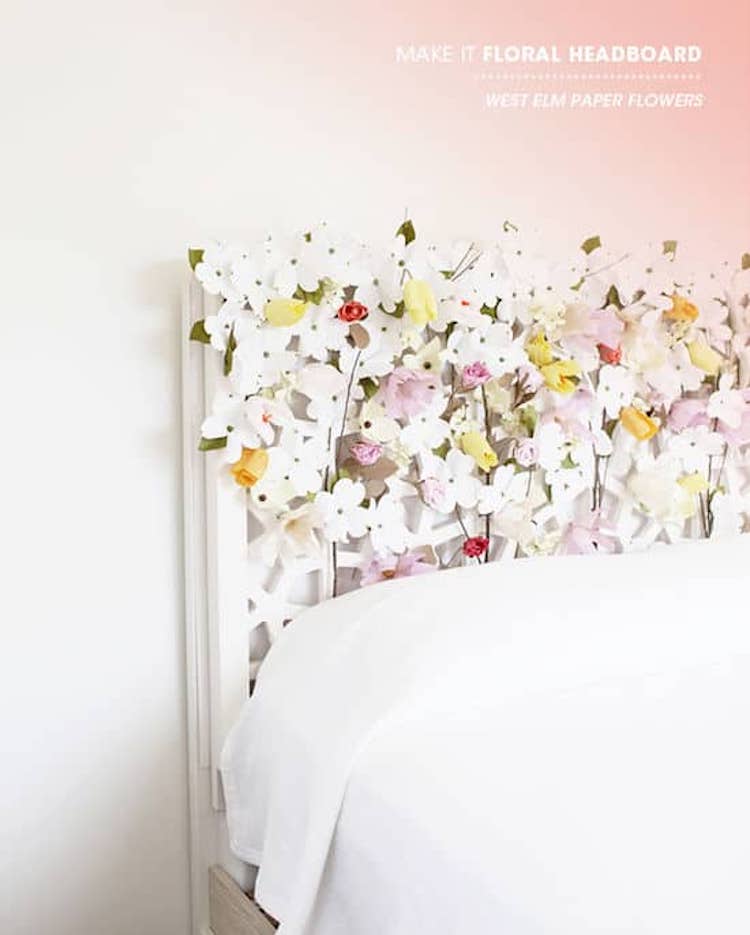
This project is perfect for anyone out there who wants to give their bedroom an all-floral look without breaking the bank. Silk flowers can get pricey, so look for paper flowers, like the ones in this picture, or make your own. In fact, you could even have a paper flower-making party with all of your friends. Sounds like a great party, right?
Take a plain headboard—preferably something with a little bit of detail, or cutouts—and decorate it with as many paper flowers as you want. Make sure to use as many colors and flower “types” as you like. And don’t forget the hot glue to secure them. To add leaves and branches, you can easily create them with wire, washi tape, or even real branches.
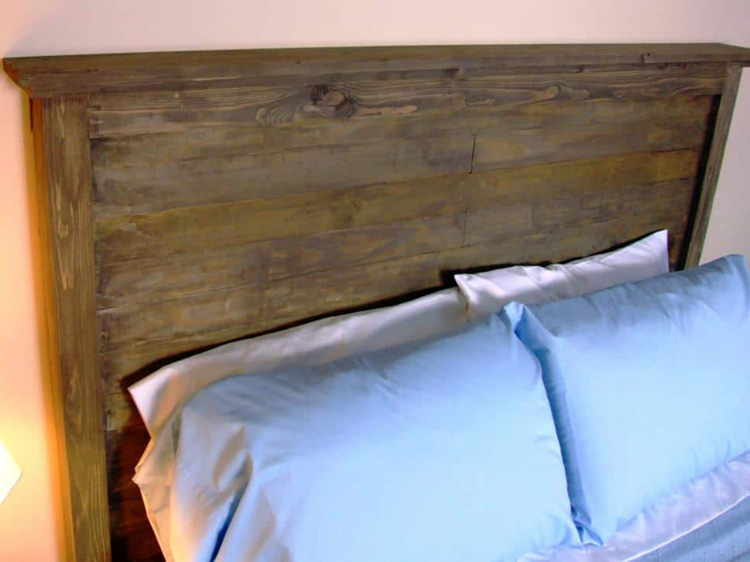
DIY Rustic Headboard

This project is for the carpenters or aspiring woodworkers who want a simple, but elegant, project that they can complete in an afternoon. If you have some planks of scrap wood lying around, then this project is going to be easy breezy. It’ll look even better if you have some older, reclaimed wood that already has a little character.
Cut out the wood in random sizes, and attach them to a 2×4 or rail on the back side with some nails. Be sure to use nails, and not screws. They will show on the front, and you want it to look as rustic as possible. You can paint the finished headboard your favorite color, stain it, or simply leave the wood raw.
Floating Headboard With LED Lighting
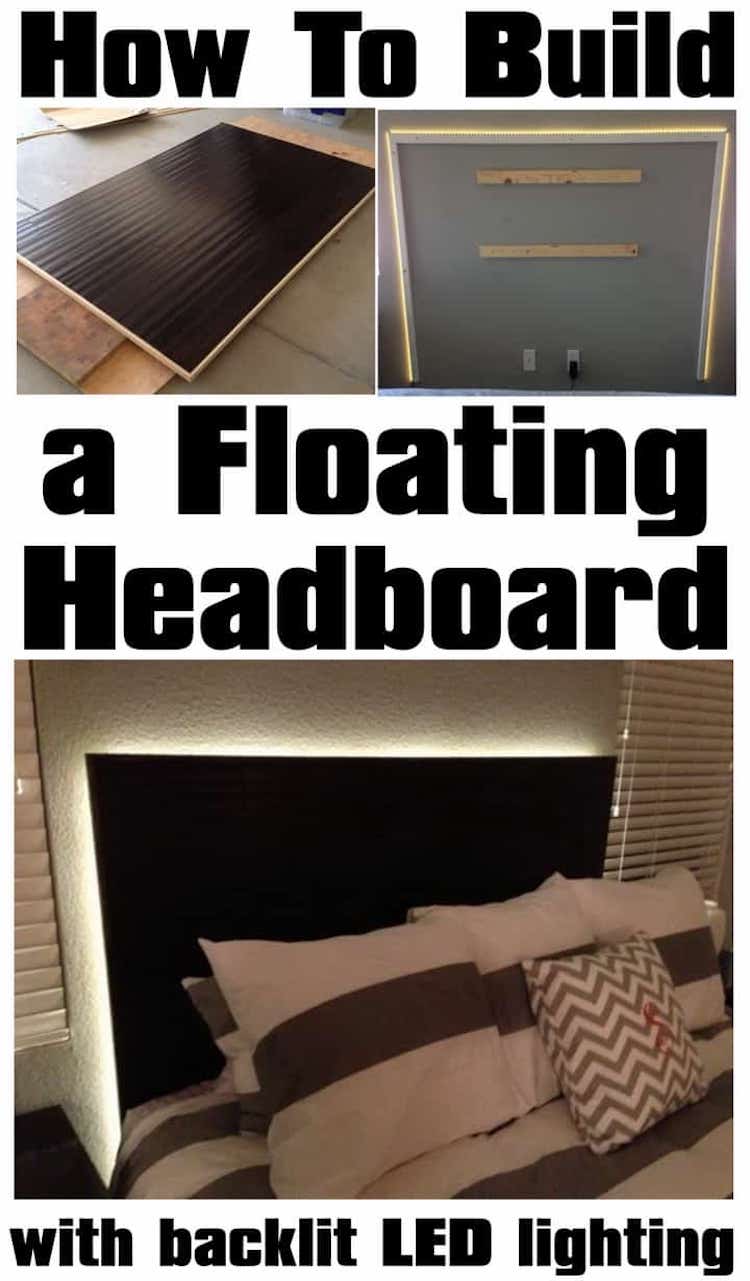
Who hasn’t noticed those beautiful floating LED headboards in all the home and luxury lifestyle magazines? Those have to be expensive, right? Well, if you’re buying one from a store: yes. They can be very expensive. These headboards can cost up to $1,000, or more in some cases. But, did you know that they’re neither challenging or expensive to make yourself?
To make a floating LED headboard, just pick any wood planks of your choice—this can be wood that you buy at the hardware store, or just scrap wood you have around the house. You can even use one solid sheet of plywood. Next, mount a string of LED lights to the back of your headboard, and place it on the wall, making sure there’s a gap of at least a few inches between the wall and the headboard for optimal glow.
Faux Tiled Headboard
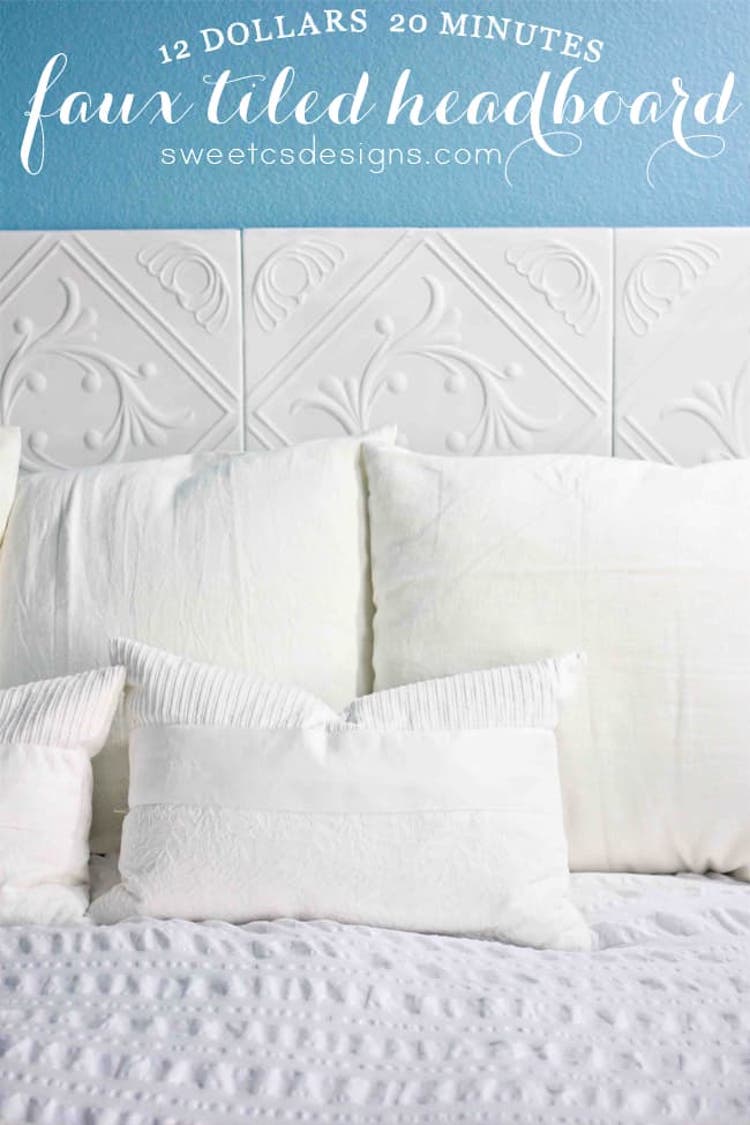
Do you love how easy tile is to clean, but don’t love the hefty price tag? If that sounds like you, then you should try these faux tiles instead. They’re easy to clean, just like the real thing, and they won’t burn through all your cash. These faux tiles are even easier to mount than the real thing, too. Messy adhesives and grout need not be applied.
To make a headboard like the one shown in this picture, all you need is to get some faux foam tiles and mount them onto the wall, using some double-sided mounting tape. You can easily find both the tiles and the tape at your local hardware store. The best part about this whole project? If you can find your supplies at the right time, you can complete this project for $12 or less.
Up-Cycled Headboard
If you aren’t keen on the idea of making a new headboard from scratch, then why not up-cycle a headboard you’ve already got in your home? You can even use the one that’s currently on your bed. Or, take a quick trip to the thrift store to search for a cheap, old headboard. The possibilities with this project are endless, and only limited by your imagination.
For example: you can cut out some strips of wood and nail them to your headboard in a design of your choosing. Or, if that’s a little more than you want to do, simply strip the old headboard, sand, and repaint it a solid color, or turn it into a painting. You can even strip it, sand it, and simply apply a stain or varnish to give it a little bit of a facelift.
DIY Vintage Sheet Headboard
Vintage themed homes have a charm all their own. But to take full advantage of this look, you have to make sure that every piece of furniture, and all of your décor, pays homage to this theme. Go big or go home, right? Now, when you’re looking to bring that vintage feel into the bedroom, it can get pretty expensive pretty fast.
But, with this cheap, easy DIY headboard, you’ll save tons of money that you’ll be able to spend on other things. All you need for this is vintage sheets to attach to the back of a cutout headboard—like the one pictured—using a staple gun. You can even use a room divider in place of a headboard. You can leave the wood in its natural finish, or sand it down and paint it a neutral color.
Headboard With A Curve
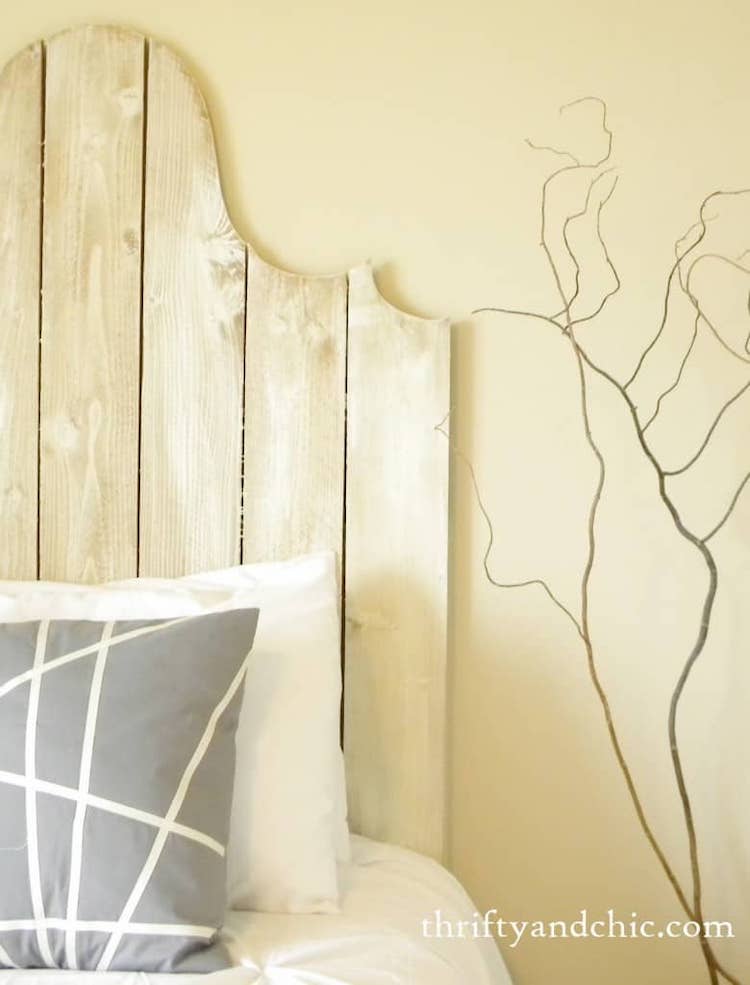
If you’re looking for a great way to spice up a headboard you’ve already got, then look no further. If you’re looking to add a lively touch to your plain, old, solid wood or planked headboard, you really should think about simply cutting a charming design into it, like the headboard pictured here. It’s quick, it’s easy, and you already have all of the materials you need.
For this one, you’ll need to have a little experience with wood-cutting, as it requires you to draw on a design, and then use a saw to cut it out. If you’re short on tools, you can absolutely cut out your design with a handsaw, though make sure that you keep it simple enough to easily accomplish. For a more intricate design, a router is the best tool to use. Then, just sand and smooth out the edges, and you’re done.
Mantle To Headboard

Did you like that mantle headboard we talked about before? If you liked that idea, but adding a floral cloth insert isn’t really your aesthetic, here’s another DIY idea that uses an old fireplace mantle, but without the granny-chic vibe. Even better, this project is also easier than the other one, requiring only a few super-basic items to complete.
Obviously—as this design also requires you to use a mantle—you will need to actually have a mantle. So, if you don’t already have one at home, it’s time to hit the antique mall. Now, unlike the first mantle project, this one uses a plain sheet of plywood and some paint. All you need to do from here is cut the plywood to fit inside the mantle, and paint minimalistic or tribal designs on the outward-facing side. That’s it. Now you have a modern twist on the mantle headboard.
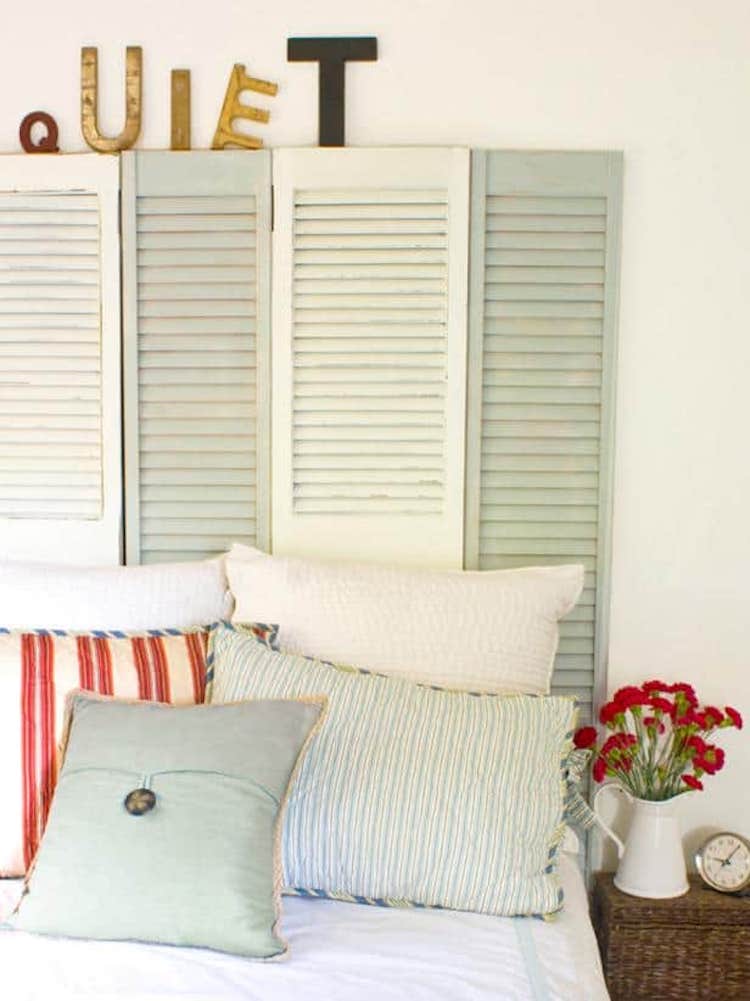
Headboard Shutter
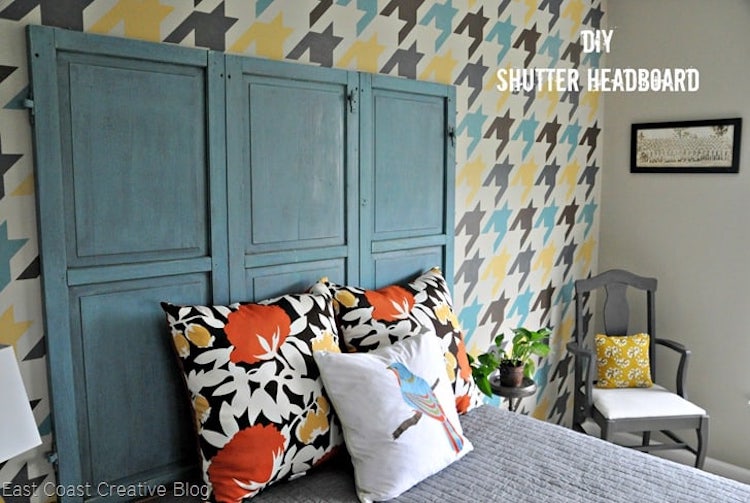
New to the DIY scene? Hey, we’ve all been there. Lots of these projects can seem really intimidating for the beginner. If that strikes a chord with you, then this could be a great project to get you started—especially if you like a vintage farmhouse feel, and find yourself longing for an excuse to get a set of those gorgeous old shutters you keep seeing at the antique mall.
This project is so easy to complete in a couple of hours, that you’ll gain some real confidence in your DIY skills. Once you’ve got the perfect set of shutters, all you need to do is sand them, and paint them in the color of your choice. From there, you can distress them, apply a glossy finish, or just leave them plain. Then simply mount them behind your bed, and you’ve just completed your first DIY project.
Ladder Turned Headboard
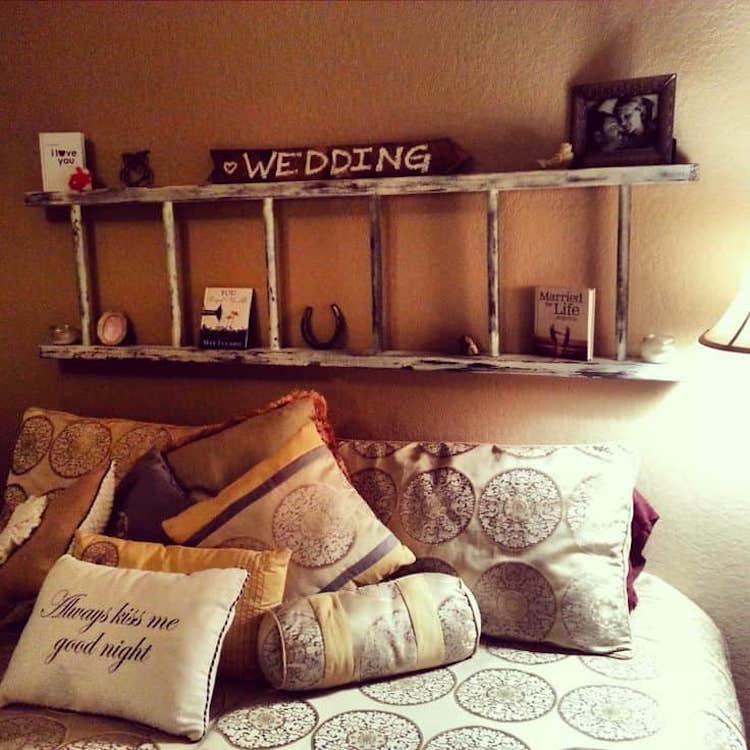
Here’s another simple DIY project that’s absolutely perfect for beginners, and takes even less time than the shutter project. But, even though it takes less time, it still results in a beautiful, and unique, headboard. It even has the added bonus that it can double as storage for your blankets and throws, if you ever want to change it out.
Check out your shed or garage for an old ladder that’s no longer being used. or head out to the thrift store or antique mall. Just like the shutters, you can sand, paint, and distress them, or simply leave them as-is. Don’t forget to add some personal nick-nacks like photos, small books, and treasures to really personalize your new headboard.
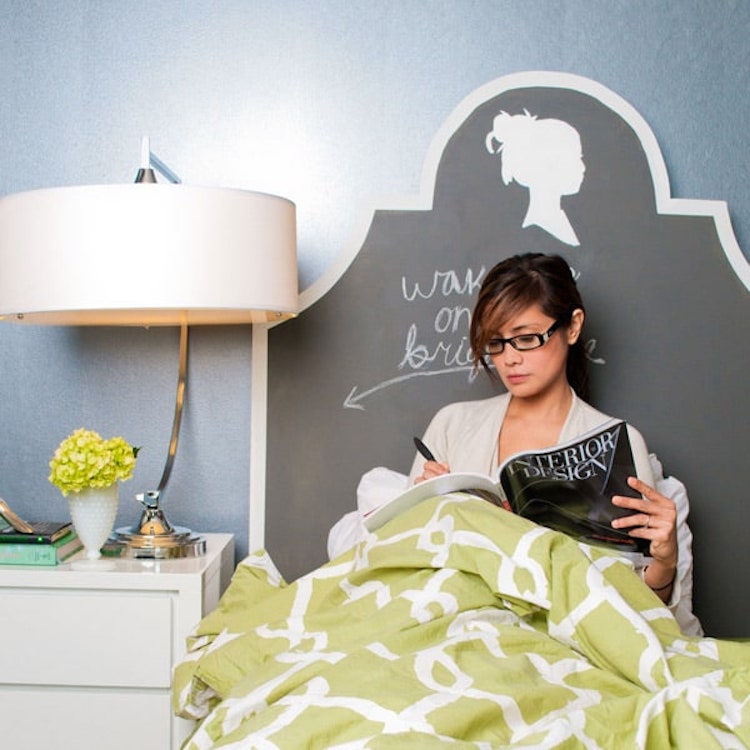
Chalkboard Wall Headboard
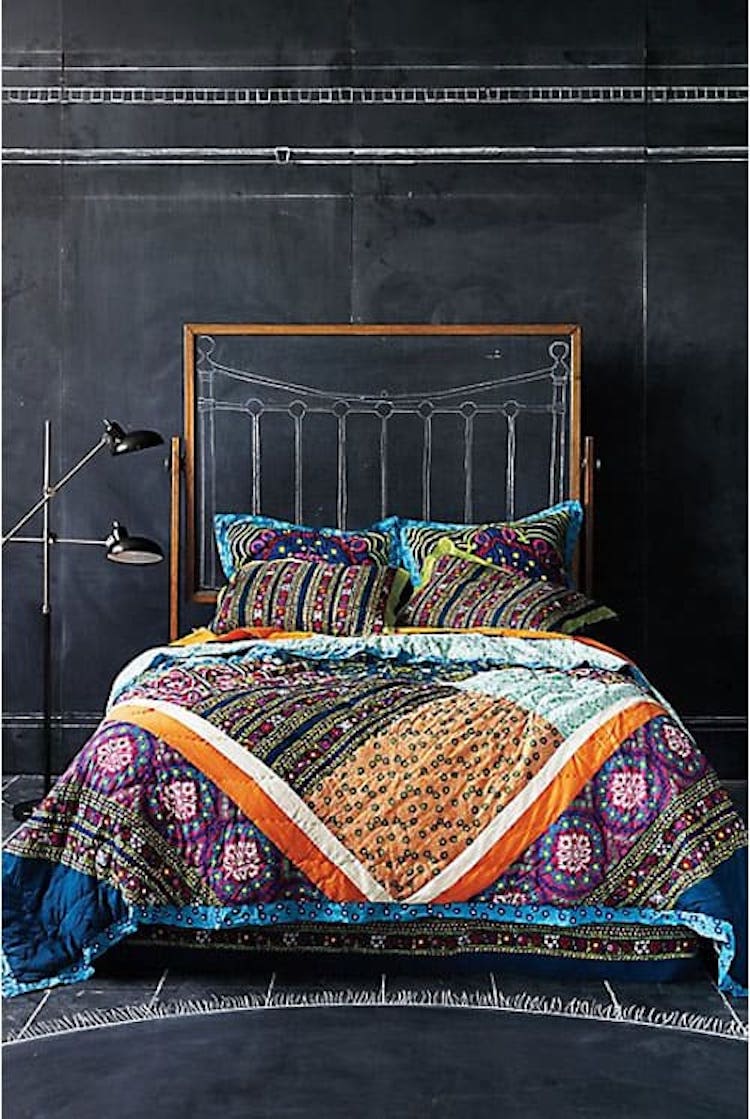
Were you that kid that used to draw on the wall? Hey, we were all that kid; hiding under an end table or behind the couch, creating vast works of hidden art. What if you could relive that magical time? Well, with a chalkboard wall turned artist headboard, you absolutely can. You don’t even have to hide it this time.
What you need to do for this one is to get yourself some chalkboard paint, and paint the whole wall behind your bed with it. Then, if you like, you can frame a small part of the wall behind the bed, to give the feeling of a headboard. Just like in the picture, you can even draw a headboard design on the wall.
Pallet Love Headboard

Here’s another pallet-inspired headboard that’s so easy to make. In fact, just like a few of the other projects, it requires no real construction, and can be done in an afternoon. Before you begin, you’ll need to get hold of some pallets. These can usually be acquired for free from businesses and shipping companies. All you have to do is ask.
Once you’ve got your pallet, you’re ready to start adding your design. You can freehand a simple painting, or use a stencil that you like, to create a pattern like the birds featured on this example. Flowers, tribal shapes, clouds—anything will work, as long as it’s something that speaks to you. You even might want to try sponging the paint on for a more “lived-in” look and feel.
Coastal Cottage Shutter Headboard
So, what if you liked the shutter project, but you’re looking for something a little more light and airy? For those who love coastal-cottage inspired designs, this simple but elegant DIY headboard project could be just the ticket for you. With just a little bit of extra effort, you transform your bedroom into your very own seaside escape.
You can get some unfinished, louvered shutters from any home improvement or hardware store—you should be able to find both unhinged panels, and pre-assembled panels. Then, paint them in soft, coastal colors, and mount them on the wall behind your bed. This project would be great to pair with the macramé headboard we talked about earlier, to give it a little something extra.
Unique Chalkboard Headboard
If you love the idea of a chalkboard headboard, but aren’t ready to commit an entire wall in your bedroom to it, then this could just be the perfect compromise for you. While it’s not initially as easy as the chalkboard wall, it’s a great way to incorporate the whimsy of a chalkboard with the practicality of a traditional headboard.
For this project, you need some wood—a sheet of plywood will do just fine—some paint primer, chalkboard paint, and dustless chalk. Sketch your desired shape on the top of the wood, and carefully cut it out with a handsaw or router. Then, prime it and paint it with the chalkboard paint, and install if behind your bed. Now all that’s left to do is to start drawing.
Old Chalkboard Turned Into A Headboard
If you happen to have an old chalkboard at home, having your chalkboard headboard dreams come true just got a whole heck of a lot easier. Literally the only thing you have to do is mount it to the wall behind your bed. Or, if you don’t want to mount it directly to the wall, you could mount the board on some 2x4s and use those to attach it to the bed frame.
This is great for creative folks who have great ideas in the middle of the night, and need somewhere to write them down. Just grab a piece of chalk and scribble away. It’s not just for notes, though. You can write down your morning routine, or your favorite affirmations, to make sure that you get up “on the right side of the bed” every morning. It’s also a fun way to add some excitement to a kid’s bedroom, allowing them to write on the walls, without actually writing on the walls.
Headboard Full Of Holes
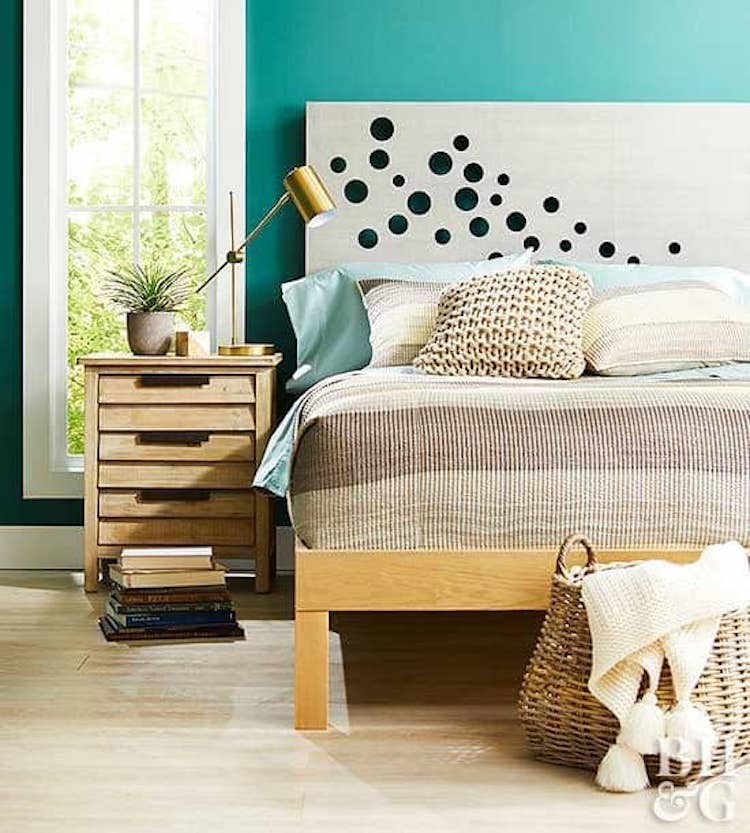
Geometric patterns are a classic go-to for all of your home decor needs. They’re simple, and go with everything. You see them everywhere in furniture stores. From paintings to upholstery. You even see these geometric patterns echoed in the designs of the furniture, itself. But, you don’t have to spend a lot of money to get the look you’re after.
In this example, the creator has simply used a drill, and various sized bits, to create circles of all different sizes in a plywood sheet. You can then paint the sheet in any color you choose to either complement or contrast your bedroom. You aren’t limited to circles, either. You could cut squares, triangles, or hearts—any shape you like. Just remember to keep your shapes in a pleasing group, otherwise your headboard might end up looking like a piece of Swiss cheese.
DIY Canopy Headboard

Did you ever dream of having a luxurious canopy bed when you were little? You most probably had that one friend who had a fancy canopy bed, which made you super jealous. Well, now you can have one of your very own. You can even have it without spending a ton of money. How? Well, by making your own, of course.
Yup, it’s not only possible, but it’s also a great way to add a little drama and luxury to your bedroom. All you need to get are some curtains, adjustable rods, anchors, screws, and curtain brackets to be mounted on the wall and ceiling, and you’re ready to make your own canopy. You can set it up just like this example here, or you can mount your curtain rods to the ceiling, and create the full-on canopy experience.
DIY Leather Headboard

Now, what if you want the satisfaction of creating your own DIY headboard, but you’re not interested in wood, cloth, tile, or an overall handmade look? This is going to be one of the most expensive—if not the most expensive—projects on this list, but if you want something more, and something that’s truly lux, you need to make this DIY leather headboard.
What you’ll need for this project will be a sheet of plywood, and some squares of cowhide tiles. It’s going to take a little digging online to find these tiles, so don’t expect to walk into the home improvement store and be able to grab them off the shelf. But, if you’re truly dedicated to this look, a little thing like some research won’t stop you.
Simple Salvaged Headboard

If you have some scrap wood on hand, or like to pick through reclaimed wood at the salvage yard, then you have everything you need to create this simple, but beautiful, reclaimed wood headboard. The great thing about the reclaimed look is that it’s not meant to be matchy-matchy, so don’t fret if you can’t find enough pieces of the same color or texture. Having mismatched pieces will only enhance the look of your finished piece.
You can even pick mismatched pieces on purpose. But, if you want a mismatched look, and can’t find enough wood to suit your needs, simply paint or stain the wood and distress it so that it fits in. To add a little personal touch to your headboard, you can scribble your favorite song lyrics, or a meaningful quote, in paint across the top.
Simple Wooden Headboard
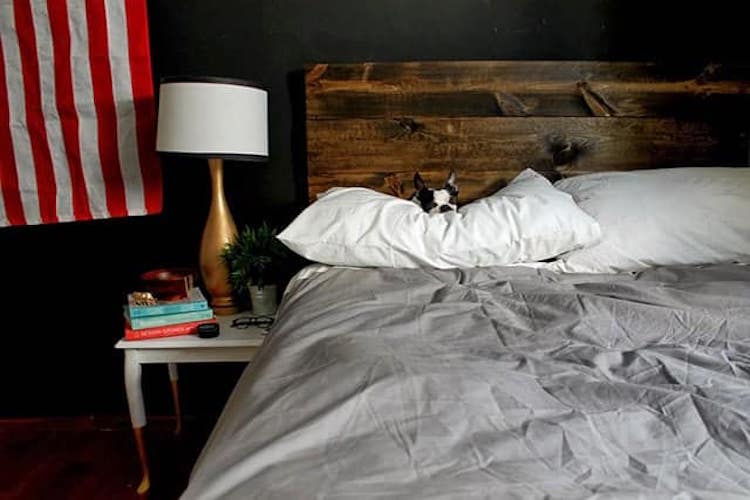
Got a few bucks burning a hole in your pocket? Because that’s all you need to spend to make this amazing wooden headboard with its rich, dark finish. In fact, you can most likely make this whole piece for about $25. You might even be able to make it for free, if you’re using scrap wood and a stain you already have on hand.
Put a few pieces of the wood together, apply a dark brown walnut stain—or whatever dark stain you want— and let it dry. For an even richer look, apply a few more coats, allowing it plenty of time to dry in between. Then, all you need to do is mount it on the wall behind your bed, and you’re all set.
Tapestry Headboard
We’ve already talked about using a tapestry, or curtain, as a headboard, but this idea is so good that it needs to be revisited. You might be thinking of tapestries as dusty old pieces of cloth that Henry VIII had in one of his many castles, but the fact is that tapestries have come such a long way in the last few decades.
You can find a huge variety of tapestries on the market, in all shapes and sizes. And you’re not just limited to floral designs, or ancient kings and queens. Did you know that you can get tapestries that have entire photographs printed on them? Nature, cityscapes, even people. The best part is that you can get them for as little as $10 in some cases, and all you have to do is hang them from a curtain rod or a colorful rope above your bed.
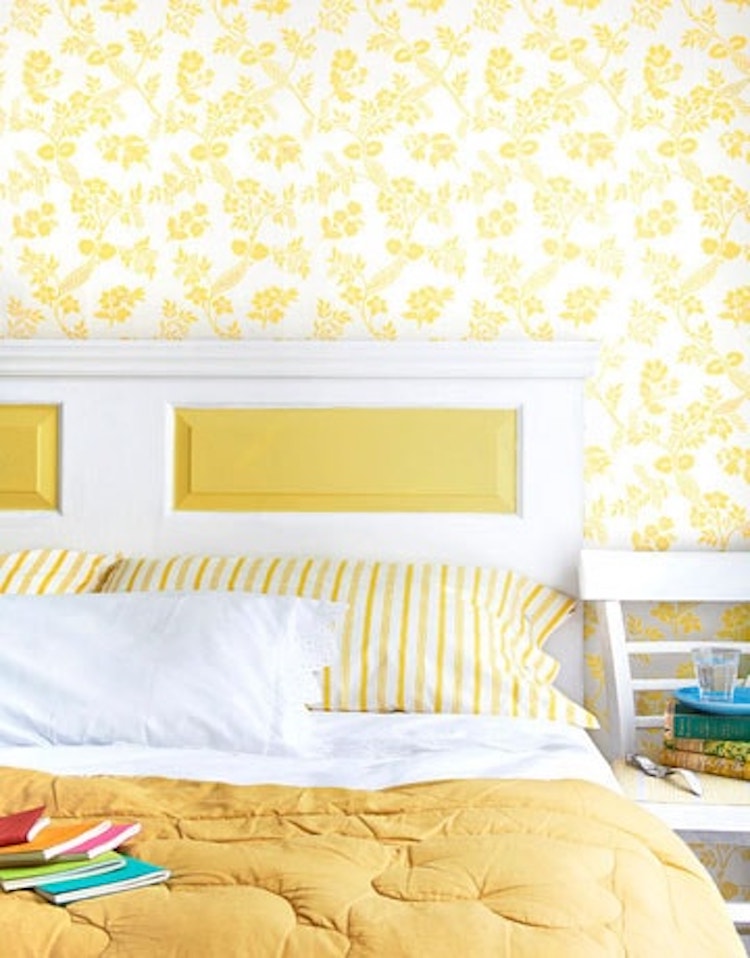
Wallpaper Headboard
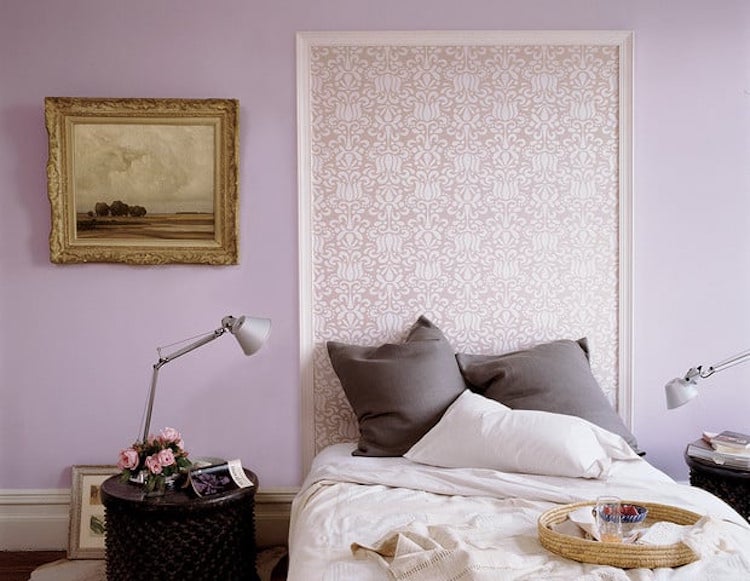
Okay, everyone knows that wallpaper is starting to make a serious comeback. But, have you ever thought of turning one of those gorgeous wallpapers you find at the store into a perky headboard? You know, the one that you just can’t stop thinking about? Probably not, right? Well, maybe you should rethink that, and give it a go. You might be surprised by the outcome.
A simple wallpaper headboard can be so elegant, while still showcasing your personal style. Especially when you frame a piece of your favorite wallpaper design, and mount it on the wall behind the bed—you can even paste the wallpaper directly onto the wall, and install a frame around it. To make it all the more interesting, try using wallpapers that complement, or are in contrast, with the color of your wall.
Some Final Thoughts
Well, we made it. We’ve reached the end of this article, friends. We’ve seen an incredible variety of unique designs and simple, inexpensive projects that’ll allow you to create the perfect headboard. There are so many fantastic ideas to choose from. Did you find the right DIY headboard for you among them? Maybe you even found several.
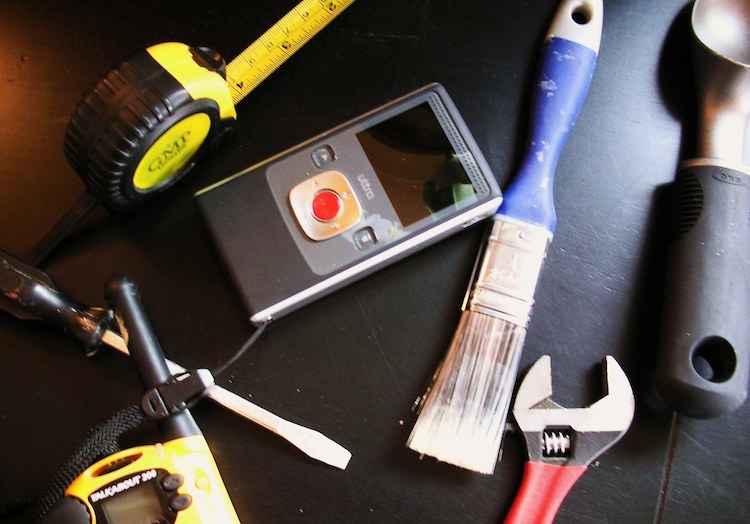
If not, you’ve probably got loads of information, and a mountain of inspiration, that’ll help you to create a DIY project that’s totally unique to you. So, what are you waiting for? Draw up a plan, gather your tools, and go shopping for the right materials. The weekend’s coming up soon, and it’s the perfect time to get cracking on your very own DIY headboard.